Monday, 27 July 2020

Displaying Password Information in solaris 11


You can use the passwd command to display password information about all users in a domain or about one particular user:
For your password information

passwd -s
For all users in current domain

passwd -s -a
For a particular user

passwd -s username
Only the entries and columns for which you have read permission will be displayed. Entries are displayed with the following format:
  • Without password aging: username status
  • With password aging: username status mm/dd/yy min max warn expire inactive
Table 11-4 NIS+ Password Display Format
Field
Description
For Further Information
username
The user's login name.
status
The user's password status. PS indicates the account has a password. LK indicates the password is locked. NP indicates the account has no password.
See "Locking a Password".
mm/dd/yy
The date, based on Greenwich mean time, that the user's password was last changed.
min
The minimum number of days since the last change that must pass before the password can be changed again.
See "Setting Minimum Password Life".
max
The maximum number of days the password can be used without having to change it.
See "Setting a Password Age Limit".
warn
The number of days' notice that users are given before their passwords have to be changed.
See "Establishing a Warning Period".
expire
A date on which users loose the ability to log in to their accounts.
See "Password Privilege Expiration".
inactive
A limit on the number of days that an account can go without being logged in to. Once that limit is passed without a log in users can no longer access their accounts.
See "Specifying Maximum Number of Inactive Days".

To display entries from a passwd table in another domain, use the -D option:
For all users in another domain

passwd -s -a -D domainname
For a particular user

passwd -s -D domainname username 


Changing Passwords

New passwords must meet the criteria described in "Password Requirements".

Changing Your Own Password

To change your password, type

station1% passwd
You will be prompted for your old password and then the new password and then the new password a second time to confirm it.

Changing Someone Else's Password

To change someone else' password, use:
To change another user's password in the same domain

passwd username
To change another user's password in a different domain

passwd -D domainname username
When using the passwd command in an NIS+ environment (see "The passwd Command and "NIS+ Environment"") to change someone else's password you must have modify rights to that user's entry in the passwd table (this usually means that you are a member of the group for the passwd table and the group has modify rights). You do not have to enter either the user's old password or your password. You will be prompted to enter the new password twice to make sure that they match. If they do not match, you will be prompted to enter them again.

Changing Root's Password

When changing root's password, you must always run chkey -p immediately after changing the password with the passwd command. Failure to run chkey -p after changing root's password will result in root being unable to properly log in.
To change a root password, follow these steps:
  1. Log in as root.
  2. Change root's password using passwd.
    Do not use nispasswd.
  3. Run chkey -p.
    You must use the -p option.

Locking a Password

When operating in an NIS+ environment (see "The passwd Command and "NIS+ Environment""), an administrator (a group member) with modify rights to a user's entry in the passwd table can use the passwd command to lock a password. An account with a locked password cannot be used. When a password is locked, the user will receive a Login incorrect message after each login attempt.
Keep in mind that locked passwords have no effect on users who are already logged in. A locked password only prevents users from performing those operations that require giving a password such as login, rlogin, ftp, or telnet.
Note also that if a user with a locked password is already logged in, and that user uses the passwd command to change passwords, the lock is broken.
You can use this feature to:
  • Temporarily lock a user's password while that user is on vacation or leave. This prevents anyone from logging in as the absent user.
  • Immediately lock one or more user passwords in the case of suspected security problem.
  • Quickly lock a dismissed employee out of the system. This is quicker and easier than eliminating that user's account and is an easy way of preserving any data stored in that account.
  • If you have assigned passwords to UNIX processes, you can lock those passwords. This allows the process to run, but prevents anyone from logging in as those processes even if they know the process password. (In most cases, processes would not be set up as NIS+ principals, but would maintain their password information in /etc files. In such a case you would have to run the passwd command in files mode to lock /etc stored passwords.)
To lock a password, use:

passwd -l username

Unlocking a Password

To unlock a user's password, you simply change it. You can "change" it back to the exact same password that it was when it was locked. Or you can change it to something new.
For example, to unlock jody's password, you would enter:

station1% passwd jody

Managing Password Aging

Password aging is a mechanism you can use to force users to periodically change their passwords.
Password aging allows you to:
  • Force a user to choose a new password the next time the user logs in. (See "Forcing Users to Change Passwords" for details.)
  • Specify a maximum number of days that a password can be used before it has to be changed. (See "Setting a Password Age Limit" for details.)
  • Specify a minimum number of days that a password has to be in existence before it can be changed. (See "Setting Minimum Password Life" for details.)
  • Specify that a warning message be displayed whenever a user logs in a specified number of days before the user's password time limit is reached. (See "Establishing a Warning Period" for details.)
  • Specify a maximum number of days that an account can be inactive. If that number of days pass without the user logging in to the account, the user's password will be locked. (See "Specifying Maximum Number of Inactive Days" for details.)
  • Specify an absolute date after which a user's password cannot be used, thus denying the user the ability to log on to the system. (See "Password Privilege Expiration" for details.)
Keep in mind that users who are already logged in when the various maximums or dates are reached are not affected by the above features. They can continue to work as normal.
Password aging limitations and activities are only activated when a user logs in or performs one of the following operations:
  • login
  • rlogin
  • telnet
  • ftp
These password aging parameters are applied on user-by-user basis. You can have different password aging requirements for different users. (You can also set general default password aging parameters as described in "Managing Password Aging".)

Forcing Users to Change Passwords

There are two ways to force a user to change passwords the next time the user logs in:
Force change keeping password aging rules in effect

passwd -f username
Force change and turn off password aging rules

passwd -x 0 username

Setting a Password Age Limit

The -max argument to the passwd command sets an age limit for the current password. In other words, it specifies the number of days that a password remains valid. After that number of days, a new password must be chosen by the user. Once the maximum number of days have passed, the next time the user tries to login with the old password a Your password has been expired for too long message is displayed and the user is forced to choose a new password in order to finish logging in to the system.
The max argument uses the following format:

passwd -x max username
Where:
  • username is the login ID of the user
  • max is one of the following values:
    • Greater than zero. Any number greater than zero sets that number of days before the password must be changed.
    • Zero (0). A value of zero (0) forces the user to change passwords the next time the user logs in, and it then turns off password aging.
    • Minus one (-1). A value of minus one (-1) turns off password aging. In other words, entering passwd -x -1 username cancels any previous password aging applied to that user.
For example, to force the user schweik to change passwords every 45 days, you would type the command:

station1% passwd -x 45 schweik

Setting Minimum Password Life

The min argument to the passwd command specifies the number of days that must pass before a user can change passwords. If a user tries to change passwords before the minimum number of days has passed, a Sorry less than N days since the last change message is displayed.
The min argument uses the following format:

passwd -x max -n min username
Where:
  • username is the login ID of the user
  • max is the maximum number of days a password is valid as described in the section above
  • min is the minimum number of days that must pass before the password can be changed.
For example, to force the user eponine to change passwords every 45 days, and prevent him from changing it for the first 7 days you would type the command:

station1% passwd -x 45 -n 7 eponine
The following rules apply to the min argument:
  • You do not have to use a min argument or specify a minimum number of days before a password can be changed.
  • If you do use the min argument, it must always be used in conjunction with the -max argument. In other words, in order to set a minimum value you must also set a maximum value.
  • If you set min to be greater than max, the user is unable to change passwords at all. For example, the command passwd -x 7 -n 8 prevents the user from changing passwords. If the user tries to change passwords, the You may not change this password message is displayed. Setting the min value greater than the max value has two effects:
    • The user is unable to change password. In this case, only someone with administer privileges could change the password. For example, in situations where multiple users share a common group password, setting the min value for that password greater than the max value would prevent any individual user from changing the group password.
    • The password is only valid for the length of time set by the max value, but the user cannot change it because the min value is greater than the max value. Thus, there is no way for the user to prevent the password from becoming invalid at the expiration of the max time period. In effect, this prevents the user from logging in after the max time period unless an administrator intervenes.

Establishing a Warning Period

The warn argument to the passwd command specifies the number of days before a password reaches its age limit that users will start to seeing a Your password will expire in N days message (where N is the number of days) when they log in.
For example, if a user's password has a maximum life of 30 days (set with the -max argument) and the warn value is set to 7 days, when the user logs in on the 24th day (one day past the warn value) the warning message Your password will expire in 7 days is displayed. When the user logs in on the 25th day the warning message Your password will expire in 6 days is displayed.
Keep in mind that the warning message is not sent by Email or displayed in a user's console window. It is displayed only when the user logs in. If the user does not log in during this period, no warning message is given.
Keep in mind that the warn value is relative to the max value. In other words, it is figured backwards from the deadline set by the max value. Thus, if the warn value is set to 14 days, the Your password will expire in N days message will begin to be displayed two weeks before the password reaches its age limit and must be changed.
Because the warn value is figured relative to the max value, it only works if a max value is in place. If there is no max value, warn values are meaningless and are ignored by the system.
The warn argument uses the following format:

passwd -x max -w warn username
Where:
  • username is the login ID of the user.
  • max is the maximum number of days a password is valid as described on "Setting a Password Age Limit".
  • warn is the number of days before the password reaches its age limit that the warning message will begin to be displayed.
For example, to force the user nilovna to change passwords every 45 days, and display a warning message 5 days before the password reaches its age limit you would type the command:

station1% passwd -x 45 -w 5 nilovna
The following rules apply to the warn argument:
  • You do not have to use the warn argument or specify a warning message. If no warn value is set, no warning message is displayed prior to a password reaching its age limit.
  • If you do use the warn argument, it must always be used in conjunction with the max argument. In other words, in order to set a warning value you must also set a maximum value.

Note - You can also use Solstice AdminSuiteTM to set a warn value for a user's password.

Turning Off Password Aging

There are two ways to turn off password aging for a given user:
Turn off aging while allowing user to retain current password

passwd -x -1 username
Force user to change password at next login, and then turn off aging

passwd -x 0 username
This sets the max value to either zero or -1 (see "Setting a Password Age Limit" for more information on this value).
For example, to force the user mendez to change passwords the next time he logs in and then turn off password aging you would type the command:

station% passwd -x 0 mendez

Note - You can also use Solstice AdminSuiteTM to set this parameter for a user's password.

You can also use the nistbladm command to set this value. For example, to turn off password aging for the user otsu and allow her to continue using her current password, you would type:

station1% nistbladm -m `shadow=0:0:-1:0:0:0:0' [name=otsu],passwd.org_dir
For additional information on using the nistbladm command, see "The nistbladm Command".

Password Privilege Expiration

You can set a specific date on which a user's password privileges expires. When a user's password privilege expires, that user can no longer have a valid password at all. In effect, this locks the user out of the system after the given date because after that date the user can no longer log in.
For example, if you specify an expire date of December 31, 1997, for a user named pete, on January 1, 1998 he will not be able to log in under that user ID regardless of what password he uses. After each login attempt he will receive a Login incorrect message.

Password Aging Versus Expiration

Expiration of a user's password privilege is not the same as password aging.
  • Password aging. A password that has not been changed for longer than the aging time limit is sometimes referred to as an expired password. But that password can still be used to log in one more time. As part of that last login process the user is forced to choose a new password.
  • Expiration of password privilege. When a user's password privilege expires, the user cannot log in at all with any password.) In other words, it is the user's permission to log in to the network that has expired.

Setting an Expiration Date

Password privilege expiration dates only take effect when the user logs in. If a user is already logged in, the expiration date has no affect until the user logs out or tries to use rlogin or telnet to connect to another machine at which time the user will not be able to log in again. Thus, if you are going to implement password privilege expiration dates, you should require your users to log out at the end of each day's work session.

Note - If you have Solstice AdminSuiteTM tools available, do not use nistbladm to set an expiration date. Use Solstice AdminSuiteTM tools because they are easier to use and provide less chance for error.

To set an expiration date with the nistbladm command:

nistbladm -m `shadow=n:n:n:n:n:n6:n' [name=login],passwd.org_dir
Where:
  • login is the user's login ID
  • n indicates the values in the other fields of the shadow column.
  • n6 is the date on which the user's password privilege expires. This date is entered as a number of days since January 1, 1970 (see Table 11-2). n6 can be one of the following values:
    • Minus one (-1). A value of minus one (-1) turns off the expiration feature. If a user's password has already expired, changing this value to -1 restores (un-expires) it. If you do not want to set any expiration date, type -1 in this field.
    • Greater than zero. A value greater than zero sets the expiration date to that number of days since 1/1/70. If you enter today's date or earlier, you immediately expire the user's password.
For example, to specify an expiration date for the user pete of December 31, 1995 you would type:

station1% nistbladm -m `shadow=n:n:n:n:n:9493:n' [name=pete],passwd.org_dir

Caution - Caution - All of the fields must be filled in with valid values.

Turning Off Password Privilege Expiration

To turn off or deactivate password privilege expiration, you must use the nistbladm command to place a -1 in this field. For example, to turn off privilege expiration for the user huck, you would type:

station1% nistbladm -m `shadow=n:n:n:n:n:-1:n' [name=huck],passwd.org_dir
Or you can use the nistbladm command reset the expiration date to some day in the future by entering a new number of days in the n6 field.

Specifying Maximum Number of Inactive Days

You can set a maximum number of days that a user can go without logging in on a given machine. Once that number of days passes without the user logging in, that machine will no longer allow that user to log in. In this situation, the user will receive a Login incorrect message after each login attempt.
This feature is tracked on a machine-by-machine basis, not a network-wide basis. That is, in an NIS+ environment, you specify the number of days a user can go without logging in by placing an entry for that user in the passwd table of the user's home domain. That number applies for that user on all machines on the network.
For example, suppose you specify a maximum inactivity period of 10 days for the user sam. On January 1, sam logs in to both machine-A and machine-B, and then logs off both machines. Four days later on January 4, sam logs in on machine-B and then logs out. Nine days after that on January 13, sam can still log in to machine-B because only 9 days have elapsed since the last time he logged in on that machine, but he can no longer log in to machine-A because thirteen days have passed since his last log in on that machine.
Keep in mind that an inactivity maximum cannot apply to a machine the user has never logged in to. No matter what inactivity maximum has been specified or how long it has been since the user has logged in to some other machine, the user can always log in to a machine that the user has never logged in to before.

Caution - Caution - Do not set inactivity maximums unless your users are instructed to log out at the end of each workday. The inactivity feature only relates to logins; it does not check for any other type of system use. If a user logs in and then leaves the system up and running at the end of each day, that user will soon pass the inactivity maximum because there has been no login for many days. When that user finally does reboot or log out, he or she won't be able to log in.


Note - If you have Solstice AdminSuiteTM tools available, do not use nistbladm to set an inactivity maximum. Use Solstice AdminSuite tools because they are easier to use and provide less chance for error.

To set a login inactivity maximum, you must use the nistbladm command in the format:

nistbladm -m `shadow=n:n:n:n:n5:n:n' [name=login],passwd.org_dir
Where:
  • login is the user's login ID
  • n indicates the values in the other fields of the shadow column.
  • n5 is the number of days the user is allowed to go between logins. Inactive can be one of the following values:
    • Minus one (-1). A value of minus one (-1) turns off the inactivity feature. The user can be inactive for any number of days without losing login privileges. This is the default.
    • Greater than zero. A value greater than zero sets the maximum inactive period to that number of days.
For example, to specify that the user sam must log in at least once every seven days, you would type:

station1% nistbladm -m `shadow=n:n:n:n:n:7:n:n' [name=sam],passwd.org_dir
To clear an inactivity maximum and allow a user who has been prevented from logging in to log in again, use nistbladm to set the inactivity value to -1.

Specifying Password Criteria and Defaults

The following subsections describe various password-related defaults and general criteria that you can specify.

The /etc/defaults/passwd File

The /etc/defaults/passwd file is used to set four general password defaults for users whose nsswitch.conf file points to files. The defaults set by the /etc/defaults/passwd file apply only to those users whose operative password information is taken from /etc files; they do not apply to anyone using either NIS maps or NIS+ tables. An /etc/defaults/passwd file on an NIS+ server only affects local users who happen to be obtaining their password information from those local files. An /etc/defaults/passwd file on an NIS+ server has no effect on the NIS+ environment or users whose nsswitch.conf file points to either nis or nisplus.
The four general password defaults governed by the /etc/defaults/passwd file are:
  • Maximum number of weeks the password is valid
  • Minimum number of weeks the password is valid
  • The number of weeks before the password becomes invalid that the user is warned
  • The minimum number of characters that a password must contain
The following principles apply to defaults set with an /etc/defaults/passwd file:
  • For users who obtain password information from local /etc files, individual password aging maximums, minimums and warnings set by the password command or Solstice AdminSuite or AdminTool override any /etc/defaults/passwd defaults. In other words, defaults set in the /etc/defaults/passwd file are not only applied to those users who do not have corresponding individual settings in their entries in their passwd table.
  • Except for password length, all the /etc/defaults/passwd file defaults are expressed as a number of weeks. (Remember that individual password aging times are expressed as a number of days.)
  • The MAXWEEKS, MINWEEKS, and WARNWEEKS defaults are all counted forward from the date of the user's last password change. (Remember that individual warn values are counted backwards from the maximum date.)
By default, /etc/defaults/passwd files already contain the entries:

MAXWEEKS=
MINWEEKS=
PASSLENGTH=
To implement an entry, simply type the appropriate number after the equal sign. Entries that do not have a number after the equal sign are inactive and have no affect on any user. Thus, to set a MAXWEEKS default of 4, you would change the /etc/defaults/passwd file to read:

MAXWEEKS=4
MINWEEKS=
PASSLENGTH=

Maximum weeks

You can use the MAXWEEKS default in the /etc/defaults/passwd file to set the maximum number of weeks that a user's password is valid. To set a default maximum time period, type the appropriate number of weeks after the equal sign in the MAXWEEKS= line:

MAXWEEKS=N
Where N is a number of weeks. For example, MAXWEEKS=9.

Minimum Weeks

You can use the MINWEEKS default in the /etc/defaults/passwd file to set the minimum nuber of weeks that must pass before a user can change passwords. To set a default minimum time period, type the appropriate number of weeks after the equal sign on the MINWEEKS= line:

MINWEEKS=N
Where N is a number of weeks. For example, MINWEEKS=2.

Warning Weeks

You can add a WARNWEEKS default to the /etc/defaults/passwd file set the number of weeks prior to a password becoming invalid due to aging that user is warned. for example, if you have set the MAXWEEKS default to 9, and you want users to be warned two weeks before their passwords become invalid, you would set the MAXWEEKS default to 7.
There is no point in setting the WARNWEEKS default unless you also set a MAXWEEKS default.
Remember that WARNWEEKS are counted forward from the date of the user's last password change, not backwards from the MAXWEEKS expiration date. Thus, WARNWEEKS must always be less than MAXWEEKS and cannot be equal to or greater than MAXWEEKS .
A WARNWEEKS default will not work unless there is also a MAXWEEKS default.
To set the warning time period, type the appropriate number of weeks after the equal sign on the WARNWEEKS= line.

WARNWEEKS=N
Where N is the number of weeks. For example, WARNWEEKS=1.

Minimum Password Length

By default, the passwd command assumes a minimum length of six characters. You can use the PASSLENGTH default in the /etc/defaults/passwd files to change that by setting the minimum number of characters that a user's password must contain to some other number.
To set the minimum number of characters to something other than six, type the appropriate number of characters after the equal sign in the PASSLENGTH= line:

PASSLENGTH=N
Where N is the number of characters. For example, PASSLENGTH=7.

Password Failure Limits

You can specify a number-of-tries limit or an amount-of-time limit (or both) for a user's attempt to change passwords. These limits are specified by adding arguments when starting the rpc.nispasswdd daemon.
Limiting the number of attempts or setting a time frame provides a limited (but not foolproof) defense against unauthorized persons attempting to change a valid password to one that they discover through trial and error.

Maximum Number of Tries

To set the maximum number of times a user can try to change a password without succeeding, use the -a number argument with rpc.nispasswdd, where number is the number of allowed tries. (You must have superuser privileges on the NIS+ master server to run rpc.nispasswdd.)
For example, to limit users to no more than four attempts (the default is 3), you would type:

station1# rpc.nispasswdd -a 4
In this case, if a user's fourth attempt at logging in is unsuccessful, the message Too many failures - try later is displayed. No further attempts are permitted for that user ID until a specified period of time has passed.

Maximum Login Time Period

To set the maximum amount a time a user can take to successfully change a password, use the -c minutes argument with rpc.nispasswdd, where minutes is the number of minutes a user has to log in. (You must have superuser privileges on the NIS+ master server to run rpc.nispasswdd.)
For example, to specify that users must successfully log in within 2 minutes, you would type:

station1# rpc.nispasswdd -c 2
In this case, if a user is unable to successfully change a password within 2 minutes, the message is displayed at the end of the two-minute period. No further attempts are permitted for that user ID until a specified period of time has passed.

How to Display the User's Login Status


Before You Begin
To use the logins command, you must become an administrator who is assigned either the User Management or the User Security rights profile. By default, the root role has this authorization. For more information, see Using Your Assigned Administrative Rights in Securing Users and Processes in Oracle Solaris 11.2 .
  • Display a user's login status by using the logins command.
    # logins -x -l username
    –x
    Displays an extended set of login status information.
    –l username
    Displays the login status for the specified user. The variable username is a user's login name. Multiple login names are separated by commas.
    The logins command uses the appropriate password database to obtain a user's login status. The database can be the local /etc/passwd file, or a password database for the naming service. For more information, see the logins (1M) man page.
Example 3-1  Displaying a User's Login Status In the following example, the login status for the user jdoe is displayed.
# logins -x -l jdoe
jdoe       500     staff           10   Jaylee Jaye Doe
/home/jdoe
/bin/bash
PS 010103 10 7 -1
jdoe
Identifies the user's login name.
500
Identifies the user ID (UID).
staff
Identifies the user's primary group.
10
Identifies the group ID (GID).
Jaylee Jaye Doe
Identifies the comment.
/home/jdoe
Identifies the user's home directory.
/bin/bash
Identifies the login shell.
PS 010170 10 7 -1
    Specifies the password aging information:
  • Last date that the password was changed
  • Number of days that are required between changes
  • Number of days before a change is required
  • Warning period


++++++++++++++++++++++++++++


last

OR

last [UserNameHere]

OR

last [option] [UserNameHere]

Example: Display Linux user last login

To display when a user named ‘vivek’ last logged in to the system, type:
$ last vivek
$ last vivek | less

Sample outputs:

Fig.01: last command in action on my Debian base nas server

The output in this example tell us when user vivek last logged in. The output will go back for several months or more as last command searches back through the file /var/log/wtmp and displays a list of all users logged in (and out) since that file was created.

Display a list of recent system use for all users

Simply type the last command:
$ last
OR
$ last | less
Sample outputs taken from my RHEL based server:

root     pts/0        10.1.6.120       Mon Jan 27 06:26   still logged in   
root     pts/0        10.1.6.120       Mon Jan 27 03:37 - 06:26  (02:48)    
root     pts/0        10.1.6.120       Sun Jan 26 02:47 - 09:28  (06:40)    
root     pts/4        10.1.6.120       Sat Jan 25 11:02 - 11:02  (00:00)    
root     pts/0        10.1.6.120       Sat Jan 25 10:15 - 13:12  (02:56)    
root     pts/4        10.1.6.120       Sat Jan 25 06:01 - 06:32  (00:31)    
root     pts/0        10.1.6.120       Sat Jan 25 03:08 - 09:04  (05:55)    
root     pts/4        10.1.6.120       Sat Jan 25 01:06 - 03:18  (02:11)    
root     pts/0        10.1.6.120       Fri Jan 24 23:59 - 02:11  (02:12)    
root     pts/0        10.1.6.120       Fri Jan 24 05:30 - 08:39  (03:08)    
root     pts/0        10.1.6.120       Thu Jan 23 04:22 - 05:41  (01:19)    
....
...
...
root     pts/1        10.1.6.120       Sun Jan  5 11:09 - 14:29  (03:20)    
root     pts/0        10.1.6.120       Sun Jan  5 10:05 - 12:19  (02:14)    
reboot   system boot  2.6.32-431.3.1.e Sun Jan  5 10:02 - 06:52 (21+20:50)  
root     pts/0        10.1.6.120       Sun Jan  5 09:58 - down   (00:00)    
root     pts/0        10.1.6.120       Sun Jan  5 03:33 - 05:45  (02:12)    
root     pts/1        10.1.6.120       Sat Jan  4 15:06 - 17:28  (02:21)    
root     pts/0        10.1.6.120       Sat Jan  4 13:46 - 15:58  (02:11)    
root     pts/0        10.1.6.120       Sat Jan  4 05:05 - 07:16  (02:11)    
root     pts/1        10.1.6.120       Fri Jan  3 14:29 - 15:44  (01:15)    
root     pts/0        10.1.6.120       Fri Jan  3 13:20 - 15:32  (02:11)    
root     pts/0        10.1.6.120       Thu Jan  2 05:19 - 05:32  (00:13)    
root     pts/0        10.1.6.120       Tue Dec 31 13:57 - 16:06  (02:09)    
 
wtmp begins Tue Dec 31 13:57:23 2013


Sunday, 12 July 2020

Linux version check

Using hostnamectl

hostnamectl is most likely the first and last command you need to execute to reveal your RHEL system version:
$ hostnamectl 
   Static hostname: localhost.localdomain
Transient hostname: status
         Icon name: computer-vm
           Chassis: vm
        Machine ID: d731df2da5f644b3b4806f9531d02c11
           Boot ID: 384b6cf4bcfc4df9b7b48efcad4b6280
    Virtualization: xen
  Operating System: Red Hat Enterprise Linux Server 7.3 (Maipo)
       CPE OS Name: cpe:/o:redhat:enterprise_linux:7.3:GA:server
            Kernel: Linux 3.10.0-514.el7.x86_64
      Architecture: x86-64

Query Release Package

Use rpm command to query Redhat's release package:
RHEL 7
$ rpm --query redhat-release-server
redhat-release-server-7.3-7.el7.x86_64
RHEL 8
$ rpm --query redhat-release
redhat-release-8.0-0.34.el8.x86_64

Common Platform Enumeration

Check Common Platform Enumeration source file:
$ cat /etc/system-release-cpe 
cpe:/o:redhat:enterprise_linux:7.3:ga:server

LSB Release

Depending on whether a redhat-lsb package is installed on your system you may also use lsb_release -d command to check Redhat's system version:
$ lsb_release -d
Description: Red Hat Enterprise Linux Server release 7.3 (Maipo)
Alternatively install redhat-lsb package with:
# yum install redhat-lsb

SUBSCRIBE TO NEWSLETTER
Subscribe to Linux Career NEWSLETTER and receive latest Linux news, jobs, career advice and tutorials.


Check Release Files

There are number of release files located in the /etc/ directory. Namely os-release, redhat-release and system-release:
$ ls /etc/*release
os-release  redhat-release  system-release
Use cat to check the content of each file to reveal your Redhat OS version. Alternatively, use the below for loop for an instant check:
$ for i in $(ls /etc/*release); do echo ===$i===; cat $i; done
Depending on your RHEL version, the output of the above shell for loop may look different:
===os-release===
NAME="Red Hat Enterprise Linux Server"
VERSION="7.3 (Maipo)"
ID="rhel"
ID_LIKE="fedora"
VERSION_ID="7.3"
PRETTY_NAME="Red Hat Enterprise Linux Server 7.3 (Maipo)"
ANSI_COLOR="0;31"
CPE_NAME="cpe:/o:redhat:enterprise_linux:7.3:GA:server"
HOME_URL="https://www.redhat.com/"
BUG_REPORT_URL="https://bugzilla.redhat.com/"

REDHAT_BUGZILLA_PRODUCT="Red Hat Enterprise Linux 7"
REDHAT_BUGZILLA_PRODUCT_VERSION=7.3
REDHAT_SUPPORT_PRODUCT="Red Hat Enterprise Linux"
REDHAT_SUPPORT_PRODUCT_VERSION="7.3"
===redhat-release===
Red Hat Enterprise Linux Server release 7.3 (Maipo)
===system-release===
Red Hat Enterprise Linux Server release 7.3 (Maipo)

Grub Config

The least reliable way on how to check Redhat's OS version is by looking at Grub configuration. Grub configuration may not produce a definitive answer, but it will provide some hints on how the system booted.

The default locations of grub config files are /boot/grub2/grub.cfg and /etc/grub2.cfg. Use grep command to check for menuentry keyword:
# grep -w menuentry /boot/grub2/grub.cfg /etc/grub2.cfg
An another alternative is to check the value of the "GRUB Environment Block":
# grep saved_entry /boot/grub2/grubenv 
saved_entry=Red Hat Enterprise Linux Server (3.10.0-514.el7.x86_64) 7.3 (Maipo)

Saturday, 4 April 2020

hostname change

Method 1 : hostnamectl

To get the current hostname of the system :
# hostnamectl status
   Static hostname: localhost.localdomain
         Icon name: computer
           Chassis: n/a
        Machine ID: 55cc1c57c7f24ed0b0d352648024cea6
           Boot ID: a12ec8e04e6b4534841d14dc8425e38c
    Virtualization: vmware
  Operating System: CentOS Linux 7 (Core)
       CPE OS Name: cpe:/o:centos:centos:7
            Kernel: Linux 3.10.0-123.el7.x86_64
      Architecture: x86_64
To set new hostname (geeklab) for the machine :
# hostnamectl set-hostname geeklab    ## static
# hostnamectl set-hostname "Geeks LAB"   ## pretty
Re-login and verify the new hostname :
# hostnamectl
   Static hostname: geekslab
   Pretty hostname: Geeks LAB
         Icon name: computer
           Chassis: n/a
        Machine ID: 55cc1c57c7f24ed0b0d352648024cea6
           Boot ID: a12ec8e04e6b4534841d14dc8425e38c
    Virtualization: vmware
  Operating System: CentOS Linux 7 (Core)
       CPE OS Name: cpe:/o:centos:centos:7
            Kernel: Linux 3.10.0-123.el7.x86_64
      Architecture: x86_64

Method 2 : nmcli

To view the current hostname :
# nmcli general hostname
localhost.localdomain
To change the hostname to geeklab :
# nmcli general hostname geeklab
We need to restart the systemd-hostnamed service for the changes to take effect :
# service systemd-hostnamed restart
Re-login and erify the hostname change :
# hostname
geeklab

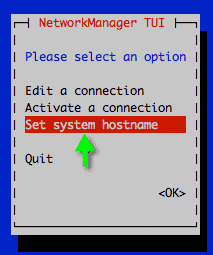
Method 3 : nmtui

We can also change the hostname using the nmtui tool :
nmtui
Select the option to “set the hostname” and hit enter
change hostname nmtui
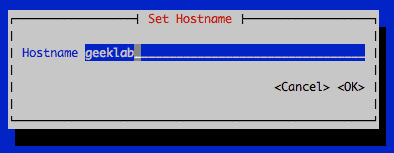
Set the hostname
set hostname nmtui
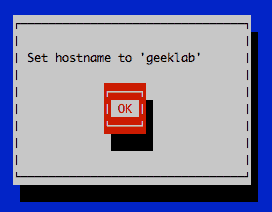
Confirm the hostname change
confirm hostname nmtui
Restart the systemd-hostnamed service for the changes to take effect.
# service systemd-hostnamed restart
Re-login and verify the hostname change.
# hostnamectl
   Static hostname: geeklab
         Icon name: computer
           Chassis: n/a
        Machine ID: 55cc1c57c7f24ed0b0d352648024cea6
           Boot ID: a12ec8e04e6b4534841d14dc8425e38c
    Virtualization: vmware
  Operating System: CentOS Linux 7 (Core)
       CPE OS Name: cpe:/o:centos:centos:7
            Kernel: Linux 3.10.0-123.el7.x86_64
      Architecture: x86_64

Method 4 : Edit /etc/hostname

This method requires a reboot of the system. View the current content of the file /etc/hostname.
# cat /etc/hostname
localhost.localdomain
To change the hostname to “geeklab”, replace the content of the /etc/hostname file with “geeklab”
# echo "geeklab" > /etc/hostname
# cat /etc/hostname
geeklab
Restart the system and verify.
# shutdown -r now
# hostname
geeklab
 
=======================================================

This document describes how to edit hostname in Oracle Linux 7.

Note: manually append "HOSTNAME=xxxxx" into file /etc/sysconfig/network and restart system will not work on Oracle Linux 7.


Solution

To edit hostname in Oracle Linux 7, use either of following methods:

1. use hostname control utility: hostnamectl
2. use NetworkManager command line tool: nmcli
3. edit /etc/hostname file directly (a reboot afterwards is required)


1. Use hostnamectl which is a command-line client to systemd-hostnamed service


Get current hostname status:

[root@localhost ~]# hostnamectl status
   Static hostname: localhost.localdomain
         Icon name: computer
           Chassis: n/a
        Machine ID: ed264df49f3f42b7b64ca75f763ad117
           Boot ID: 3ec1705218b9499b9619e1bdca7be737
    Virtualization: oracle
  Operating System: Oracle Linux Server 7.1
       CPE OS Name: cpe:/o:oracle:linux:7:1
            Kernel: Linux 3.8.13-55.1.6.el7uek.x86_64
      Architecture: x86_64


Set hostname:

[root@localhost ~]# hostnamectl set-hostname oraclelinux.oracle.com
[root@localhost ~]#


Re-login terminal session:

[root@oraclelinux ~]# hostnamectl status
   Static hostname: oraclelinux.oracle.com
         Icon name: computer
           Chassis: n/a
        Machine ID: ed264df49f3f42b7b64ca75f763ad117
           Boot ID: 3ec1705218b9499b9619e1bdca7be737
    Virtualization: oracle
  Operating System: Oracle Linux Server 7.1
       CPE OS Name: cpe:/o:oracle:linux:7:1
            Kernel: Linux 3.8.13-55.1.6.el7uek.x86_64
      Architecture: x86_64

2. nmcli


Check current hostname:

[root@localhost ~]# nmcli general hostname
localhost.localdomain


Modify hostname and restart ystemd-hostnamed service:

[root@localhost ~]# nmcli general hostname oraclelinux.oracle.com
[root@localhost ~]# systemctl restart systemd-hostnamed


Re-login terminal session:

[root@oraclelinux ~]# hostname
oraclelinux.oracle.com


3. Edit /etc/hostname


View current content:

[root@localhost ~]# cat /etc/hostname
localhost.localdomain


Replace file content with new hostname:

[root@localhost ~]# echo "oraclelinux.oracle.com" > /etc/hostname
[root@localhost ~]# cat /etc/hostname
oraclelinux.oracle.com


Restart system and verify:

[root@oraclelinux ~]# hostname
oraclelinux.oracle.com

Sunday, 29 March 2020

mount point ZFS file

Automatic Mount Points

  • When you change the mountpoint property from legacy or none to a specific path, ZFS automatically mounts the file system.
  • If ZFS is managing a file system but it is currently unmounted, and the mountpoint property is changed, the file system remains unmounted.
Any file system whose mountpoint property is not legacy is managed by ZFS. In the following example, a file system is created whose mount point is automatically managed by ZFS:
# zfs create pool/filesystem
# zfs get mountpoint pool/filesystem
NAME             PROPERTY      VALUE                      SOURCE
pool/filesystem  mountpoint    /pool/filesystem           default
# zfs get mounted pool/filesystem
NAME             PROPERTY      VALUE                      SOURCE
pool/filesystem  mounted       yes                        -
You can also explicitly set the mountpoint property as shown in the following example:
# zfs set mountpoint=/mnt pool/filesystem
# zfs get mountpoint pool/filesystem
NAME             PROPERTY      VALUE                      SOURCE
pool/filesystem  mountpoint    /mnt                       local
# zfs get mounted pool/filesystem
NAME             PROPERTY      VALUE                      SOURCE
pool/filesystem  mounted       yes                        -
When the mountpoint property is changed, the file system is automatically unmounted from the old mount point and remounted to the new mount point. Mount-point directories are created as needed. If ZFS is unable to unmount a file system due to it being active, an error is reported, and a forced manual unmount is necessary.

Legacy Mount Points

You can manage ZFS file systems with legacy tools by setting the mountpoint property to legacy. Legacy file systems must be managed through the mount and umount commands and the /etc/vfstab file. ZFS does not automatically mount legacy file systems at boot time, and the ZFS mount and umount commands do not operate on file systems of this type. The following examples show how to set up and manage a ZFS file system in legacy mode:
# zfs set mountpoint=legacy tank/home/eric
# mount -F zfs tank/home/eschrock /mnt
To automatically mount a legacy file system at boot time, you must add an entry to the /etc/vfstab file. The following example shows what the entry in the /etc/vfstab file might look like:
#device         device        mount           FS      fsck    mount   mount
#to mount       to fsck       point           type    pass    at boot options
#

tank/home/eric  -        /mnt           zfs        -        yes        -    
The device to fsck and fsck pass entries are set to - because the fsck command is not applicable to ZFS file systems. For more information about ZFS data integrity, see Transactional Semantics.

Mounting ZFS File Systems

ZFS automatically mounts file systems when file systems are created or when the system boots. Use of the zfs mount command is necessary only when you need to change mount options, or explicitly mount or unmount file systems.
The zfs mount command with no arguments shows all currently mounted file systems that are managed by ZFS. Legacy managed mount points are not displayed. For example:
# zfs mount | grep tank/home
zfs mount | grep tank/home
tank/home                       /tank/home
tank/home/jeff                  /tank/home/jeff
You can use the -a option to mount all ZFS managed file systems. Legacy managed file systems are not mounted. For example:
# zfs mount -a
By default, ZFS does not allow mounting on top of a nonempty directory. For example:
# zfs mount tank/home/lori
cannot mount 'tank/home/lori': filesystem already mounted
Legacy mount points must be managed through legacy tools. An attempt to use ZFS tools results in an error. For example:
# zfs mount tank/home/bill
cannot mount 'tank/home/bill': legacy mountpoint
use mount(1M) to mount this filesystem
# mount -F zfs tank/home/billm
When a file system is mounted, it uses a set of mount options based on the property values associated with the file system. The correlation between properties and mount options is as follows:
Table 6-4 ZFS Mount-Related Properties and Mount Options
Property
Mount Option
atime
atime/noatime
devices
devices/nodevices
exec
exec/noexec
nbmand
nbmand/nonbmand
readonly
ro/rw
setuid
setuid/nosetuid
xattr
xattr/noaxttr
The mount option nosuid is an alias for nodevices,nosetuid.
You can use the NFSv4 mirror mount features to help you better manage NFS-mounted ZFS home directories.
When file systems are created on the NFS server, the NFS client can automatically discover these newly created file systems within their existing mount of a parent file system.
For example, if the server neo already shares the tank file system and client zee has it mounted, /tank/baz is automatically visible on the client after it is created on the server.
zee# mount neo:/tank /mnt
zee# ls /mnt
baa    bar

neo# zfs create tank/baz

zee% ls /mnt
baa    bar    baz
zee% ls /mnt/baz
file1    file2 

Using Temporary Mount Properties

If any of the mount options described in the preceding section are set explicitly by using the-o option with the zfs mount command, the associated property value is temporarily overridden. These property values are reported as temporary by the zfs get command and revert back to their original values when the file system is unmounted. If a property value is changed while the file system is mounted, the change takes effect immediately, overriding any temporary setting.
In the following example, the read-only mount option is temporarily set on the tank/home/neil file system. The file system is assumed to be unmounted.
# zfs mount -o ro users/home/neil
To temporarily change a property value on a file system that is currently mounted, you must use the special remount option. In the following example, the atime property is temporarily changed to off for a file system that is currently mounted:
# zfs mount -o remount,noatime users/home/neil
NAME             PROPERTY  VALUE  SOURCE
users/home/neil  atime     off    temporary
# zfs get atime users/home/perrin
For more information about the zfs mount command, see zfs(1M).

Unmounting ZFS File Systems

You can unmount ZFS file systems by using the zfs unmount subcommand. The unmount command can take either the mount point or the file system name as an argument.
In the following example, a file system is unmounted by its file system name:
# zfs unmount users/home/mark
In the following example, the file system is unmounted by its mount point:
# zfs unmount /users/home/mark
The unmount command fails if the file system is busy. To forcibly unmount a file system, you can use the -f option. Be cautious when forcibly unmounting a file system if its contents are actively being used. Unpredictable application behavior can result.
# zfs unmount tank/home/eric
cannot unmount '/tank/home/eric': Device busy
# zfs unmount -f tank/home/eric
To provide for backward compatibility, the legacy umount command can be used to unmount ZFS file systems. For example:
# umount /tank/home/bob
===============================

Technique 4. Lazy Unmount

To fix umount target is busy error, a methodical way is the Lazy unmount. It unmounts the mount point from the Linux filesystem. To remove all the processes attached to the device (that are not in use) slowly, you can use this solution. Since the Lazy unmount removes all references to the detached file system, it will detach the file system when there is no more process accessing the unmounted file system. So, if the last suggested method is your choice, type:

sudo umount -l /Path/to/target

In this way, all ideal processes will be automatically removed and the device will be unmounted. According to your used case, all the recent solutions can be chosen to fix umount target is busy error.

=========================


Monday, 16 March 2020

DNS client configure for solaris 11

How to Enable a DNS Client

  1. Become an administrator.
  2. List the domains to search and the IP addresses for the DNS name servers, then update the SMF repository. For example:
    # svccfg -s network/dns/client
        svc:/network/dns/client> setprop config/search = astring: ("example.com" "sales.example.com")
        svc:/network/dns/client> setprop config/nameserver = net_address: (192.0.2.10 192.0.2.11)
        svc:/network/dns/client> select network/dns/client:default
        svc:/network/dns/client:default> refresh
        svc:/network/dns/client:default> quit
    Make sure to refresh the service for the changes to take effect.
  3. Update the name service switch information to use DNS. The first command updates the DNS configuration information in the SMF repository.
    # svccfg -s system/name-service/switch
        svc:/system/name-service/switch> setprop config/host = astring: "files dns"
        svc:/system/name-service/switch> select system/name-service/switch:default
        svc:/system/name-service/switch:default> refresh
        svc:/system/name-service/switch:default> quit
  4. Start the services that are needed to run the DNS client.
    # svcadm enable network/dns/client
    # svcadm enable system/name-service/switch
  5. Verify that the DNS client is enabled by using one or both of the following commands:
    # dig knownserver.example.com
    # getent hosts knownserver.example.com
    The dig command when used alone checks that the DNS client is enabled. The getent hosts command verifies the /etc/nsswitch.conf file's use of the DNS client.
Example 16  Setting Multiple DNS Options for a Client Simultaneously The following example shows how you would set multiple /etc/resolv.conf options.
# svccg
svc:> select /network/dns/client
svc:/network/dns/client> setprop config/options = "ndots:2 retrans:3 retry:1"
svc:/network/dns/client> listprop config/options
config/options astring     ndots:2 retrans:3 retry:1
svc:/network/dns/client> exit
# svcadm refresh dns/client
# grep options /etc/resolv.conf
options ndots:2 retrans:3 retry:1

Wednesday, 26 February 2020

NFS for solaris 11

NFS Commands

These commands must be run as root to be fully effective, but requests for information can be made by all users:

automount Command

This command installs autofs mount points and associates the information in the automaster files with each mount point. The syntax of the command is as follows:
automount [ -t duration ] [ -v ]
-t duration sets the time, in seconds, that a file system is to remain mounted, and -v selects the verbose mode. Running this command in the verbose mode allows for easier troubleshooting.
If not specifically set, the value for duration is set to 5 minutes. In most circumstances, this value is good. However, on systems that have many automounted file systems, you might need to increase the duration value. In particular, if a server has many users active, checking the automounted file systems every 5 minutes can be inefficient. Checking the autofs file systems every 1800 seconds, which is 30 minutes, could be more optimal. By not unmounting the file systems every 5 minutes, /etc/mnttab can become large. To reduce the output when df checks each entry in /etc/mnttab, you can filter the output from df by using the -F option (see the df(1M) man page) or by using egrep.
You should consider that adjusting the duration also changes how quickly changes to the automounter maps are reflected. Changes cannot be seen until the file system is unmounted. Refer to Modifying the Maps for instructions on how to modify automounter maps.
The same specifications you would make on the command line can be made using the sharectl command. However, unlike the command line options, the SMF repository preserves your specifications, through service restarts, system reboots, as well as system upgrades. These are the parameters that can be set for the automount command.
timeout
Sets the duration for a file system to remain idle before the file system is unmounted. This keyword is the equivalent of the -t argument for the automount command. The default value is 600.
automount_verbose
Provides notification of autofs mounts, unmounts, and other nonessential events. This keyword is the equivalent of the -v argument for automount. The default value is FALSE.

clear_locks Command

This command enables you to remove all file, record, and share locks for an NFS client. You must be root to run this command. From an NFS server, you can clear the locks for a specific client. From an NFS client, you can clear locks for that client on a specific server. The following example would clear the locks for the NFS client that is named tulip on the current system.
# clear_locks tulip
Using the -s option enables you to specify which NFS host to clear the locks from. You must run this option from the NFS client, which created the locks. In this situation, the locks from the client would be removed from the NFS server that is named bee.
# clear_locks -s bee

CautionCaution - This command should only be run when a client crashes and cannot clear its locks. To avoid data corruption problems, do not clear locks for an active client.

fsstat Command

The fsstat utility enables you to monitor file system operations by file system type and by mount point. Various options allow you to customize the output. See the following examples.
This example shows output for NFS version 3, version 4, and the root mount point.
% fsstat nfs3 nfs4 /
  new     name   name    attr    attr   lookup   rddir   read   read   write   write
 file    remov   chng     get     set      ops     ops    ops  bytes     ops   bytes
3.81K       90  3.65K   5.89M   11.9K    35.5M   26.6K   109K   118M   35.0K   8.16G  nfs3
  759      503    457   93.6K   1.44K     454K   8.82K  65.4K   827M     292    223K  nfs4
25.2K    18.1K  1.12K   54.7M    1017     259M   1.76M  22.4M  20.1G   1.43M   3.77G  /
This example uses the -i option to provide statistics about the I/O operations for NFS version 3, version 4, and the root mount point.
% fsstat -i nfs3 nfs4 /
 read    read    write   write   rddir   rddir   rwlock   rwulock
  ops   bytes      ops   bytes     ops   bytes      ops       ops
 109K    118M    35.0K   8.16G   26.6K   4.45M     170K      170K  nfs3
65.4K    827M      292    223K   8.82K   2.62M    74.1K     74.1K  nfs4
22.4M   20.1G    1.43M   3.77G   1.76M   3.29G    25.5M     25.5M  /
This example uses the -n option to provide statistics about the naming operations for NFS version 3, version 4, and the root mount point.
% fsstat -n nfs3 nfs4 /
lookup   creat   remov  link   renam  mkdir  rmdir   rddir  symlnk  rdlnk
 35.5M   3.79K      90     2   3.64K      5      0   26.6K      11   136K  nfs3
  454K     403     503     0     101      0      0   8.82K     356  1.20K  nfs4
  259M   25.2K   18.1K   114    1017     10      2   1.76M      12  8.23M  /
For more information, see the fsstat(1M) man page.

mount Command

With this command, you can attach a named file system, either local or remote, to a specified mount point. For more information, see the mount(1M) man page. Used without arguments, mount displays a list of file systems that are currently mounted on your computer.
Many types of file systems are included in the standard Oracle Solaris installation. Each file-system type has a specific man page that lists the options to mount that are appropriate for that file-system type. The man page for NFS file systems is mount_nfs(1M). For UFS file systems, see mount_ufs(1M).
The Solaris 7 release includes the ability to select a path name to mount from an NFS server by using an NFS URL instead of the standard server:/pathname syntax. See How to Mount an NFS File System Using an NFS URL for further information.

CautionCaution - The version of the mount command does not warn about invalid options. The command silently ignores any options that cannot be interpreted. Ensure that you verify all of the options that were used so that you can prevent unexpected behavior.

mount Options for NFS File Systems

The subsequent text lists some of the options that can follow the -o flag when you are mounting an NFS file system. For a complete list of options, refer to the mount_nfs(1M) man page.
bg|fg
These options can be used to select the retry behavior if a mount fails. The bg option causes the mount attempts to be run in the background. The fg option causes the mount attempt to be run in the foreground. The default is fg, which is the best selection for file systems that must be available. This option prevents further processing until the mount is complete. bg is a good selection for noncritical file systems because the client can do other processing while waiting for the mount request to be completed.
forcedirectio
This option improves performance of large sequential data transfers. Data is copied directly to a user buffer. No caching is performed in the kernel on the client. This option is off by default.
Previously, all write requests were serialized by both the NFS client and the NFS server. The NFS client has been modified to permit an application to issue concurrent writes, as well as concurrent reads and writes, to a single file. You can enable this functionality on the client by using the forcedirectio mount option. When you use this option, you are enabling this functionality for all files within the mounted file system. You could also enable this functionality on a single file on the client by using the directio() interface. Unless this functionality has been enabled, writes to files are serialized. Also, if concurrent writes or concurrent reads and writes are occurring, then POSIX semantics are no longer being supported for that file.
For an example of how to use this option, refer to Using the mount Command.
largefiles
With this option, you can access files that are larger than 2 Gbytes. Whether a large file can be accessed can only be controlled on the server, so this option is silently ignored on NFS version 3 mounts. By default, all UFS file systems are mounted with largefiles. For mounts that use the NFS version 2 protocol, the largefiles option causes the mount to fail with an error.
nolargefiles
This option for UFS mounts guarantees that no large files can exist on the file system. See the mount_ufs(1M) man page. Because the existence of large files can only be controlled on the NFS server, no option for nolargefiles exists when using NFS mounts. Attempts to NFS-mount a file system by using this option are rejected with an error.
nosuid|suid
The nosuid option is the equivalent of specifying the nodevices option with the nosetuid option. When the nodevices option is specified, the opening of device-special files on the mounted file system is disallowed. When the nosetuid option is specified, the setuid bit and setgid bit in binary files that are located in the file system are ignored. The processes run with the privileges of the user who executes the binary file.
The suid option is the equivalent of specifying the devices option with the setuid option. When the devices option is specified, the opening of device-special files on the mounted file system is allowed. When the setuid option is specified, the setuid bit and the setgid bit in binary files that are located in the file system are honored by the kernel.
If neither option is specified, the default option is suid, which provides the default behavior of specifying the devices option with the setuid option.
The following table describes the effect of combining nosuid or suid with devices or nodevices, and setuid or nosetuid. Note that in each combination of options, the most restrictive option determines the behavior.
Behavior From the Combined Options
Option
Option
Option
The equivalent of nosetuid with nodevices
nosuid
nosetuid
nodevices
The equivalent of nosetuid with nodevices
nosuid
nosetuid
devices
The equivalent of nosetuid with nodevices
nosuid
setuid
nodevices
The equivalent of nosetuid with nodevices
nosuid
setuid
devices
The equivalent of nosetuid with nodevices
suid
nosetuid
nodevices
The equivalent of nosetuid with devices
suid
nosetuid
devices
The equivalent of setuid with nodevices
suid
setuid
nodevices
The equivalent of setuid with devices
suid
setuid
devices
The nosuid option provides additional security for NFS clients that access potentially untrusted servers. The mounting of remote file systems with this option reduces the chance of privilege escalation through importing untrusted devices or importing untrusted setuid binary files. All these options are available in all Oracle Solaris file systems.
public
This option forces the use of the public file handle when contacting the NFS server. If the public file handle is supported by the server, the mounting operation is faster because the MOUNT protocol is not used. Also, because the MOUNT protocol is not used, the public option allows mounting to occur through a firewall.
rw|ro
The -rw and -ro options indicate whether a file system is to be mounted read-write or read-only. The default is read-write, which is the appropriate option for remote home directories, mail-spooling directories, or other file systems that need to be changed by users. The read-only option is appropriate for directories that should not be changed by users. For example, shared copies of the man pages should not be writable by users.
sec=mode
You can use this option to specify the authentication mechanism to be used during the mount transaction. The value for mode can be one of the following.
  • Use krb5 for Kerberos version 5 authentication service.
  • Use krb5i for Kerberos version 5 with integrity.
  • Use krb5p for Kerberos version 5 with privacy.
  • Use none for no authentication.
  • Use dh for Diffie-Hellman (DH) authentication.
  • Use sys for standard UNIX authentication.
The modes are also defined in /etc/nfssec.conf.
soft|hard
An NFS file system that is mounted with the soft option returns an error if the server does not respond. The hard option causes the mount to continue to retry until the server responds. The default is hard, which should be used for most file systems. Applications frequently do not check return values from soft-mounted file systems, which can make the application fail or can lead to corrupted files. If the application does check the return values, routing problems and other conditions can still confuse the application or lead to file corruption if the soft option is used. In most situations, the soft option should not be used. If a file system is mounted by using the hard option and becomes unavailable, an application that uses this file system hangs until the file system becomes available.

Using the mount Command

Refer to the following examples.
  • In NFS version 2 or version 3, both of these commands mount an NFS file system from the server bee read-only.
    # mount -F nfs -r bee:/export/share/man /usr/man
    # mount -F nfs -o ro bee:/export/share/man /usr/man
    In NFS version 4, the following command line would accomplish the same mount.
    # mount -F nfs -o vers=4 -r bee:/export/share/man /usr/man
  • In NFS version 2 or version 3, this command uses the -O option to force the man pages from the server bee to be mounted on the local system even if /usr/man has already been mounted. See the following.
    # mount -F nfs -O bee:/export/share/man /usr/man
    In NFS version 4, the following command line would accomplish the same mount.
    # mount -F nfs -o vers=4 -O bee:/export/share/man /usr/man
  • In NFS version 2 or version 3, this command uses client failover.
    # mount -F nfs -r bee,wasp:/export/share/man /usr/man
    In NFS version 4, the following command line uses client failover.
    # mount -F nfs -o vers=4 -r bee,wasp:/export/share/man /usr/man

    Note - When used from the command line, the listed servers must support the same version of the NFS protocol. Do not use both version 2 and version 3 servers when running mount from the command line. You can use both servers with autofs. Autofs automatically selects the best subset of version 2 or version 3 servers.

  • Here is an example of using an NFS URL with the mount command in NFS version 2 or version 3.
    # mount -F nfs nfs://bee//export/share/man /usr/man
    Here is an example of using an NFS URL with the mount command in NFS version 4.
    # mount -F nfs -o vers=4 nfs://bee//export/share/man /usr/man
  • Use the forcedirectio mount option to enable the client to permit concurrent writes, as well as concurrent reads and writes, to a file. Here is an example.
    # mount -F nfs -o forcedirectio bee:/home/somebody /mnt
    In this example, the command mounts an NFS file system from the server bee and enables concurrent reads and writes for each file in the directory /mnt. When support for concurrent reads and writes is enabled, the following occurs.
    • The client permits applications to write to a file in parallel.
    • Caching is disabled on the client. Consequently, data from reads and writes is kept on the server. More explicitly, because the client does not cache the data that is read or written, any data that the application does not already have cached for itself is read from the server. The client's operating system does not have a copy of this data. Normally, the NFS client caches data in the kernel for applications to use.
      Because caching is disabled on the client, the read-ahead and write-behind processes are disabled. A read-ahead process occurs when the kernel anticipates the data that an application might request next. The kernel then starts the process of gathering that data in advance. The kernel's goal is to have the data ready before the application makes a request for the data.
      The client uses the write-behind process to increase write throughput. Instead of immediately starting an I/O operation every time an application writes data to a file, the data is cached in memory. Later, the data is written to the disk.
      Potentially, the write-behind process permits the data to be written in larger chunks or to be written asynchronously from the application. Typically, the result of using larger chunks is increased throughput. Asynchronous writes permit overlap between application processing and I/O processing. Also, asynchronous writes permit the storage subsystem to optimize the I/O by providing a better sequencing of the I/O. Synchronous writes force a sequence of I/O on the storage subsystem that might not be optimal.
    • Significant performance degradation can occur if the application is not prepared to handle the semantics of data that is not being cached. Multithreaded applications avoid this problem.

    Note - If support for concurrent writes is not enabled, all write requests are serialized. When requests are serialized, the following occurs. When a write request is in progress, a second write request has to wait for the first write request to be completed before proceeding.

  • Use the mount command with no arguments to display file systems that are mounted on a client. See the following.
    % mount
    / on /dev/dsk/c0t3d0s0 read/write/setuid on Wed Apr 7 13:20:47 2004
    /usr on /dev/dsk/c0t3d0s6 read/write/setuid on Wed Apr 7 13:20:47 20041995
    /proc on /proc read/write/setuid on Wed Apr 7 13:20:47 2004
    /dev/fd on fd read/write/setuid on Wed Apr 7 13:20:47 2004
    /tmp on swap read/write on Wed Apr 7 13:20:51 2004
    /opt on /dev/dsk/c0t3d0s5 setuid/read/write on Wed Apr 7 13:20:51 20041995
    /home/kathys on bee:/export/home/bee7/kathys              
      intr/noquota/nosuid/remote on Wed Apr 24 13:22:13 2004

umount Command

This command enables you to remove a remote file system that is currently mounted. The umount command supports the -V option to allow for testing. You might also use the -a option to unmount several file systems at one time. If mount-points are included with the -a option, those file systems are unmounted. If no mount points are included, an attempt is made to unmount all file systems that are listed in /etc/mnttab except for the “required” file systems, such as /, /usr, /var, /proc, /dev/fd, and /tmp. Because the file system is already mounted and should have an entry in /etc/mnttab, you do not need to include a flag for the file-system type.
The -f option forces a busy file system to be unmounted. You can use this option to unhang a client that is hung while trying to mount an unmountable file system.

CautionCaution - By forcing an unmount of a file system, you can cause data loss if files are being written to.

See the following examples.
Example 6-1 Unmounting a File System
This example unmounts a file system that is mounted on /usr/man:
# umount /usr/man
Example 6-2 Using Options with umount
This example displays the results of running umount -a -V:
# umount -a -V
umount /home/kathys
umount /opt
umount /home
umount /net
Notice that this command does not actually unmount the file systems.

mountall Command

Use this command to mount all file systems or a specific group of file systems that are listed in a file-system table. The command provides a way of doing the following:
  • Selecting the file-system type to be accessed with the -F FSType option
  • Selecting all the remote file systems that are listed in a file-system table with the -r option
  • Selecting all the local file systems with the -l option
Because all file systems that are labeled as NFS file-system type are remote file systems, some of these options are redundant. For more information, see the mountall(1M) man page.
Note that the following two examples of user input are equivalent:
# mountall -F nfs
# mountall -F nfs -r

umountall Command

Use this command to unmount a group of file systems. The -k option runs the fuser -k mount-point command to kill any processes that are associated with the mount-point. The -s option indicates that unmount is not to be performed in parallel. -l specifies that only local file systems are to be used, and -r specifies that only remote file systems are to be used. The -h host option indicates that all file systems from the named host should be unmounted. You cannot combine the -h option with -l or -r.
The following is an example of unmounting all file systems that are mounted from remote hosts:
# umountall -r
The following is an example of unmounting all file systems that are currently mounted from the server bee:
# umountall -h bee

sharectl Command

This release includes the sharectl utility, which is an administrative tool that enables you to configure and manage file-sharing protocols, such as NFS. You can use this command to do the following:
  • Set client and server operational properties
  • Display property values for a specific protocol
  • Obtain the status of a protocol
The sharectl utility uses the following syntax:
# sharectl subcommand [option] [protocol]
The sharectl utility supports the following subcommands:
Table 6-2 Subcommands for sharectl Utility
Subcommand
Description
set
Defines the properties for a file-sharing protocol. For a list of properties and property values, see the parameters described in the nfs(4) man page.
get
Displays the properties and property values for the specified protocol.
status
Displays whether the specified protocol is enabled or disabled. If no protocol is specified, the status of all file-sharing protocols is displayed.
For more information about the sharectl utility, see the following:

set Subcommand

The set subcommand, which defines the properties for a file-sharing protocol, supports the following options:
-h
Provides an online-help description
-p
Defines a property for the protocol
The set subcommand uses the following syntax:
# sharectl set [-h] [-p property=value] protocol

Note - The following:
  • You must have root privileges to use the set subcommand.
  • You do not need to repeat this command-line syntax for each additional property value. You can use the -p option multiple times to define multiple properties on the same command line.

The following example sets the minimum version of the NFS protocol for the client to 3:
# sharectl set -p nfs_client_versmin=3 nfs

get Subcommand

The get subcommand, which displays the properties and property values for the specified protocol, supports the following options:
-h
Provides an online-help description.
-p
Identifies the property value for the specified property. If the -p option is not used, all property values are displayed.
The get subcommand uses the following syntax:
# sharectl get [-h] [-p property] protocol

Note - You must have root privileges to use the get subcommand.

The following example uses servers, which is the property that enables you to specify the maximum number of concurrent NFS requests:
# sharectl get -p servers nfs
servers=1024
In the following example, because the -p option is not used, all property values are displayed:
# sharectl get nfs
servers=1024
listen_backlog=32
protocol=ALL
servers=32
lockd_listen_backlog=32
lockd_servers=20
lockd_retransmit_timeout=5
grace_period=90
nfsmapid_domain=company.com
server_versmin=2
server_versmax=4
client_versmin=2
client_versmax=4
server_delegation=on
max_connections=-1
device=

status Subcommand

The status subcommand, which displays whether the specified protocol is enabled or disabled, supports the following option:
-h
Provides an online-help description
The status subcommand uses the following syntax:
# sharectl status [-h] [protocol]
The following example shows the status of the NFS protocol:
# sharectl status nfs
nfs       enabled

share Command

With this command, you can make a local file system on an NFS server available for mounting. You can also use the share command to display a list of the file systems on your system that are currently shared. The NFS server must be running for the share command to work.
The objects that can be shared include any directory tree. However, each file system hierarchy is limited by the disk slice or partition that the file system is located on.
A file system cannot be shared if that file system is part of a larger file system that is already being shared. For example, if /usr and /usr/local are on one disk slice, /usr can be shared or /usr/local can be shared. However, if both directories need to be shared with different share options, /usr/local must be moved to a separate disk slice.
You can gain access to a file system that is read-only shared through the file handle of a file system that is read-write shared. However, the two file systems have to be on the same disk slice. You can create a more secure situation. Place those file systems that need to be read-write on a separate partition or separate disk slice from the file systems that you need to share as read-only.

Note - For information about how NFS version 4 functions when a file system is unshared and then reshared, refer to Unsharing and Resharing a File System in NFS Version 4.

Non-File-System-Specific share Options

Some of the options that you can include with the -o flag are as follows.
rw|ro
The pathname file system is shared read-write or read-only for all clients.
rw=accesslist
The file system is shared read-write for the clients that are listed only. All other requests are denied. Starting with the Solaris 2.6 release, the list of clients that are defined in accesslist has been expanded. See Setting Access Lists With the share Command for more information. You can use this option to override an -ro option.

NFS-Specific share Options

The options that you can use with NFS file systems include the following.
aclok
This option enables an NFS server that supports the NFS version 2 protocol to be configured to do access control for NFS version 2 clients. Without this option, all clients are given minimal access. With this option, the clients have maximal access. For instance, on file systems that are shared with the -aclok option, if anyone has read permissions, everyone does. However, without this option, you can deny access to a client who should have access permissions. A decision to permit too much access or too little access depends on the security systems already in place. See Using Access Control Lists to Protect UFS Files in Oracle Solaris Administration: Security Services for more information about access control lists (ACLs).

Note - To use ACLs, ensure that clients and servers run software that supports the NFS version 3 and NFS_ACL protocols. If the software only supports the NFS version 3 protocol, clients obtain correct access but cannot manipulate the ACLs. If the software supports the NFS_ACL protocol, the clients obtain correct access and can manipulate the ACLs.

anon=uid
You use uid to select the user ID of unauthenticated users. If you set uid to -1, the server denies access to unauthenticated users. You can grant root access by setting anon=0, but this option allows unauthenticated users to have root access, so use the root option instead.
index=filename
When a user accesses an NFS URL, the -index=filename option forces the HTML file to load, instead of displaying a list of the directory. This option mimics the action of current browsers if an index.html file is found in the directory that the HTTP URL is accessing. This option is the equivalent of setting the DirectoryIndex option for httpd. For instance, suppose that the dfstab file entry resembles the following:
share -F nfs -o ro,public,index=index.html /export/web
These URLs then display the same information:
nfs://<server>/<dir>
nfs://<server>/<dir>/index.html
nfs://<server>//export/web/<dir>
nfs://<server>//export/web/<dir>/index.html
http://<server>/<dir>
http://<server>/<dir>/index.html
log=tag
This option specifies the tag in /etc/nfs/nfslog.conf that contains the NFS server logging configuration information for a file system. This option must be selected to enable NFS server logging.
nosuid
This option signals that all attempts to enable the setuid or setgid mode should be ignored. NFS clients cannot create files with the setuid or setgid bits on.
public
The -public option has been added to the share command to enable WebNFS browsing. Only one file system on a server can be shared with this option.
root=accesslist
The server gives root access to the hosts in the list. By default, the server does not give root access to any remote hosts. If the selected security mode is anything other than -sec=sys, you can only include client host names in the accesslist. Starting with the Solaris 2.6 release, the list of clients that are defined in accesslist is expanded. See Setting Access Lists With the share Command for more information.

CautionCaution - Granting root access to other hosts has wide security implications. Use the -root= option with extreme caution.

root=client-name
The client-name value is used with AUTH_SYS authentication to check the client's IP address against a list of addresses provided by exportfs(1B). If a match is found, root access is given to the file systems being shared.
root=host-name
For secure NFS modes, such as AUTH_SYS or RPCSEC_GSS, the server checks the clients' principal names against a list of host-based principal names that are derived from an access list. The generic syntax for the client's principal name is root@hostname. For Kerberos V the syntax is root/hostname.fully.qualified@REALM. When you use the host-name value, the clients on the access list must have the credentials for a principal name. For Kerberos V, the client must have a valid keytab entry for its root/hostname.fully.qualified@REALM principal name. For more information, see Configuring Kerberos Clients in Oracle Solaris Administration: Security Services.
sec=mode[:mode]
mode selects the security modes that are needed to obtain access to the file system. By default, the security mode is UNIX authentication. You can specify multiple modes, but use each security mode only once per command line. Each -mode option applies to any subsequent -rw, -ro, -rw=, -ro=, -root=, and -window= options until another -mode is encountered. The use of -sec=none maps all users to user nobody.
window=value
value selects the maximum lifetime in seconds of a credential on the NFS server. The default value is 30000 seconds or 8.3 hours.

Setting Access Lists With the share Command

The accesslist can include a domain name, a subnet number, or an entry to deny access, as well as the standard -ro=, -rw=, or -root= options. These extensions should simplify file access control on a single server without having to change the namespace or maintain long lists of clients.
This command provides read-only access for most systems but allows read-write access for rose and lilac:
# share -F nfs -o ro,rw=rose:lilac /usr/src
In the next example, read-only access is assigned to any host in the eng netgroup. The client rose is specifically given read-write access.
# share -F nfs -o ro=eng,rw=rose /usr/src

Note - You cannot specify both rw and ro without arguments. If no read-write option is specified, the default is read-write for all clients.

To share one file system with multiple clients, you must type all options on the same line. Multiple invocations of the share command on the same object “remember” only the last command that is run. This command enables read-write access to three client systems, but only rose and tulip are given access to the file system as root.
# share -F nfs -o rw=rose:lilac:tulip,root=rose:tulip /usr/src
When sharing a file system that uses multiple authentication mechanisms, ensure that you include the -ro, -ro=, -rw, -rw=, -root, and -window options after the correct security modes. In this example, UNIX authentication is selected for all hosts in the netgroup that is named eng. These hosts can only mount the file system in read-only mode. The hosts tulip and lilac can mount the file system read-write if these hosts use Diffie-Hellman authentication. With these options, tulip and lilac can mount the file system read-only even if these hosts are not using DH authentication. However, the host names must be listed in the eng netgroup.
# share -F nfs -o sec=dh,rw=tulip:lilac,sec=sys,ro=eng /usr/src
Even though UNIX authentication is the default security mode, UNIX authentication is not included if the -sec option is used. Therefore, you must include a -sec=sys option if UNIX authentication is to be used with any other authentication mechanism.
You can use a DNS domain name in the access list by preceding the actual domain name with a dot. The string that follows the dot is a domain name, not a fully qualified host name. The following entry allows mount access to all hosts in the eng.example.com domain:
# share -F nfs -o ro=.:.eng.example.com /export/share/man
In this example, the single “.” matches all hosts that are matched through the NIS namespace. The results that are returned from these name services do not include the domain name. The “.eng.example.com” entry matches all hosts that use DNS for namespace resolution. DNS always returns a fully qualified host name. So, the longer entry is required if you use a combination of DNS and the other namespaces.
You can use a subnet number in an access list by preceding the actual network number or the network name with “@”. This character differentiates the network name from a netgroup or a fully qualified host name. You must identify the subnet in either /etc/networks or in an NIS namespace. The following entries have the same effect if the 192.168 subnet has been identified as the eng network:
# share -F nfs -o ro=@eng /export/share/man
# share -F nfs -o ro=@192.168 /export/share/man
# share -F nfs -o ro=@192.168.0.0 /export/share/man
The last two entries show that you do not need to include the full network address.
If the network prefix is not byte aligned, as with Classless Inter-Domain Routing (CIDR), the mask length can be explicitly specified on the command line. The mask length is defined by following either the network name or the network number with a slash and the number of significant bits in the prefix of the address. For example:
# share -f nfs -o ro=@eng/17 /export/share/man
# share -F nfs -o ro=@192.168.0/17 /export/share/man
In these examples, the “/17” indicates that the first 17 bits in the address are to be used as the mask. For additional information about CIDR, look up RFC 1519.
You can also select negative access by placing a “-” before the entry. Note that the entries are read from left to right. Therefore, you must place the negative access entries before the entry that the negative access entries apply to:
# share -F nfs -o ro=-rose:.eng.example.com /export/share/man
This example would allow access to any hosts in the eng.example.com domain except the host that is named rose.

unshare Command

This command allows you to make a previously available file system unavailable for mounting by clients. When you unshare an NFS file system, access from clients with existing mounts is inhibited. The file system might still be mounted on the client, but the files are not accessible. The unshare command deletes the share permanently unless the -t option is used to temporarily unshare the file system.

Note - For information about how NFS version 4 functions when a file system is unshared and then reshared, refer to Unsharing and Resharing a File System in NFS Version 4.

The following is an example of unsharing a specific file system:
# unshare /usr/src

shareall Command

This command allows for multiple file systems to be shared. When used with no options, the command shares all entries in /etc/dfs/dfstab. You can include a file name to specify the name of a file that lists share command lines. If you do not include a file name, /etc/dfs/dfstab is checked. If you use a “-” to replace the file name, you can type share commands from standard input.
The following is an example of sharing all file systems that are listed in a local file:
# shareall /etc/dfs/special_dfstab

unshareall Command

This command makes all currently shared resources unavailable. The -F FSType option selects a list of file-system types that are defined in /etc/dfs/fstypes. This flag enables you to choose only certain types of file systems to be unshared. The default file-system type is defined in /etc/dfs/fstypes. To choose specific file systems, use the unshare command.
The following is an example of unsharing all NFS-type file systems:
# unshareall -F nfs

showmount Command

This command displays one of the following:
  • All clients that have remotely mounted file systems that are shared from an NFS server
  • Only the file systems that are mounted by clients
  • The shared file systems with the client access information

Note - The showmount command only shows NFS version 2 and version 3 exports. This command does not show NFS version 4 exports.

The command syntax is as follows:
showmount [ -ade ] [ hostname ]
-a
Prints a list of all the remote mounts. Each entry includes the client name and the directory.
-d
Prints a list of the directories that are remotely mounted by clients.
-e
Prints a list of the files that are shared or are exported.
hostname
Selects the NFS server to gather the information from.
If hostname is not specified, the local host is queried.
The following command lists all clients and the local directories that the clients have mounted:
# showmount -a bee
lilac:/export/share/man
lilac:/usr/src
rose:/usr/src
tulip:/export/share/man
The following command lists the directories that have been mounted:
# showmount -d bee
/export/share/man
/usr/src
The following command lists file systems that have been shared:
# showmount -e bee
/usr/src                                (everyone)
/export/share/man                    eng

setmnt Command

This command creates an /etc/mnttab table. The mount and umount commands consult the table. Generally, you do not have to run this command manually, as this command runs automatically when a system is booted.

nfsref Command

The nfsref command is used to add, delete or list NFSv4 referrals. The command syntax is as follows:
nfsref add path location [ location … ]
nfsref remove path
nfsref lookup path
path
Selects the name for the reparse point.
location
Identifies one or more NFS or SMB shared file systems to be associated with the reparse point.