Sunday 29 December 2019

Expand zpool online Solaris

Expand zpool online Solaris

09 Aug
I have Solaris 11.1 runnning on SPARC T4-2, connected to SAN using powerpath. I want to expand an existing zpool without any downtime and loss of data. Below is what I did to achieve it.
1. Check the zpool details.
root@falcon-db:~# zpool list datapool
NAME SIZE ALLOC FREE CAP DEDUP HEALTH ALTROOT
datapool 9.94G 126K 9.94G 0% 1.00x ONLINE –
root@falcon-db:~#
2. Expand the LUN from storage side.
3. Run cfgadm -al and format. Select the expanded disk.(check cylinder size before expanding)
97. emcpower8a <DGC-VRAID-0532 cyl 32766 alt 2 hd 64 sec 10>
/pseudo/emcp@8
Specify disk (enter its number): 97
selecting emcpower8a
[disk formatted]
Note: detected additional allowable expansion storage space that can be
added to current SMI label’s computed capacity.
Select to adjust the label capacity.
4. Select expand option and select the slice mounted to expand.
partition> e
Expansion of label cannot be undone; continue (y/n) ? y
The expanded capacity was added to the disk label and “s2”.
Disk label was written to disk.
partition> 0
Part Tag Flag Cylinders Size Blocks
0 unassigned wm 0 – 32765 10.00GB (32766/0/0) 20970240
Enter partition id tag[unassigned]:
Enter partition permission flags[wm]:
Enter new starting cyl[0]:
Enter partition size[20970240b, 32766c, 32765e, 10239.38mb, 10.00gb]: $
partition> p
Current partition table (unnamed):
Total disk cylinders available: 39319 + 2 (reserved cylinders)
Part Tag Flag Cylinders Size Blocks
0 unassigned wm 0 – 39318 12.00GB (39319/0/0) 25164160
1 unassigned wu 0 0 (0/0/0) 0
2 backup wu 0 – 39318 12.00GB (39319/0/0) 25164160
partition> l
Ready to label disk, continue? y
partition>
Cylinder size after expansion of disk
97. emcpower8a <DGC-VRAID-0532 cyl 39319 alt 2 hd 64 sec 10>
/pseudo/emcp@8
5. Set the autoexpand option to on and the pool is expanded to new size.
root@falcon-db:~# zpool list datapool
NAME SIZE ALLOC FREE CAP DEDUP HEALTH ALTROOT
datapool 9.94G 89.5K 9.94G 0% 1.00x ONLINE –
root@falcon-db:~#
root@falcon-db:~# zpool get autoexpand datapool
NAME PROPERTY VALUE SOURCE
datapool autoexpand off local
root@falcon-db:~# zpool set autoexpand=on datapool
root@falcon-db:~#
root@falcon-db:~#
root@falcon-db:~# zpool list datapool
NAME SIZE ALLOC FREE CAP DEDUP HEALTH ALTROOT
datapool 11.9G 136K 11.9G 0% 1.00x ONLINE –
root@falcon-db:~#

Tuesday 24 December 2019

local repository for solaris

How to Copy a Repository From a zip File

  1. Create a ZFS file system for the new repository. Create the repository in a shared location. Set atime to off when you create the repository file system. Consider setting the compression property. See Best Practices for Creating and Using Local IPS Package Repositories.
    $ zfs create -o atime=off rpool/VARSHARE/pkgrepos
    $ zfs create rpool/VARSHARE/pkgrepos/solaris
    $ zfs get atime rpool/VARSHARE/pkgrepos/solaris
    NAME                             PROPERTY  VALUE  SOURCE
    rpool/VARSHARE/pkgrepos/solaris  atime     off    inherited from rpool/VARSHARE/pkgrepos
  2. Get the package repository files. Download the Oracle Solaris IPS package repository files (*repo*.zip) from the same location where you downloaded the system installation image. In addition to the repository files, download the install-repo.ksh script and the README and checksum .txt files.
    $ ls
    install-repo.ksh           sol-11_3-ga-repo-3of4.zip
    README-zipped-repo.txt     sol-11_3-ga-repo-4of4.zip
    sol-11_3-ga-repo-1of4.zip  sol-11_3-ga-repo.txt
    sol-11_3-ga-repo-2of4.zip
    On the Oracle Technology Network (OTN) site, you can download the install-repo.ksh script and the README and digest .txt files directly. On the My Oracle Support (MOS) and the Oracle Software Delivery Cloud (OSDC) sites, the install-repo.ksh script and the README and checksum .txt files are part of the Repository Installation Guide. For example, in the IPS Repository column of an SRU Index on MOS, select the Installation Guide document. A new page displays that contains the following buttons:
    • Download. Select this button to retrieve the Repository Installation Guide .zip file. The Repository Installation Guide file contains the following files:
      • The install-repo.ksh script.
      • The README-zipped-repo.txt README file that explains how to use the install-repo.ksh script.
      • The digest.txt checksums file for the repository files (*repo*.zip).
      • Text and HTML versions of a README file that describes this particular SRU.
    • View Readme. Select this button to display the README file that describes this particular SRU.
    • View Digest. Select this button to pop up a new window that displays the SHA-1 and MD5 checksums for the Repository Installation Guide .zip file.
  3. Make sure the script file is executable.
    $ chmod +x install-repo.ksh
  4. Run the repository installation script. The repository installation script, install-repo.ksh, uncompresses each repository file (*repo*.zip) into the specified directory.
    The install-repo.ksh script optionally performs the following additional tasks:
    • Verifies checksums of the repository files.
      If you do not specify the -c option to verify checksums, verify the checksums manually before you run the repository installation script. Run the following digest command, and compare the output with the appropriate checksum from the digest.txt file:
      $ digest -v -a sha256 *repo*.zip
    • Adds the repository content to existing content if the specified destination already contains a repository.
    • Verifies the final repository.
      If you do not specify the -v option to verify the repository, use the info, list, and verify subcommands of the pkgrepo command to verify the repository after you run the repository installation script.
    • Creates an ISO image file for mounting and distribution.
      If you use the -I option to create an .iso file, the .iso file and the README file that explains how to use the .iso file are in the specified destination directory (-d).
  5. Verify the repository content. If you did not specify the -v option in the previous step, use the info, list, and verify subcommands of the pkgrepo command to check that the repository has been copied correctly. If the pkgrepo verify command reports errors, try using the pkgrepo fix command to fix the errors. See the pkgrepo(1) man page for more information.
  6. Snapshot the new repository.
    $ zfs snapshot rpool/VARSHARE/pkgrepos/solaris@sol-11_3_0
Example 1  Creating a New Repository From a zip File In this example, no repository exists until the .zip files are unpacked. The script can take the following options:
-s
Optional. Specifies the full path to the directory where the *repo*.zip files are located. Default: The current directory.
-d
Required. Specifies the full path to the directory where you want the repository.
-i
Optional. Specifies the files to use to populate this repository. The source directory could contain multiple sets of *repo*.zip files. Default: The newest image available in the source directory.
-c
Optional. Compares the checksums of the *repo*.zip files with the checksums in the specified file. If you specify -c with no argument, the default file used is the digest.txt file for the -i image in the source directory.
-v
Optional. Verifies the final repository.
-I
Optional. Creates an ISO image of the repository in the source directory. Also leaves a mkiso.log log file in the source directory.
-h
Optional. Displays a usage message.
$ ./install-repo.ksh -d /var/share/pkgrepos/solaris -c -v -I
Comparing digests of downloaded files...done. Digests match.
Uncompressing sol-11_3-ga-repo-1of4.zip...done.
Uncompressing sol-11_3-ga-repo-2of4.zip...done.
Uncompressing sol-11_3-ga-repo-3of4.zip...done.
Uncompressing sol-11_3-ga-repo-4of4.zip...done.
Repository can be found in /var/share/pkgrepos/solaris.
Initiating repository verification.
Building ISO image...done.
ISO image can be found at:
/tank/downloads/sol-11_3-ga-repo.iso
Instructions for using the ISO image can be found at:
/var/share/pkgrepos/solaris/README-repo-iso.txt  
$ ls /var/share/pkgrepos/solaris
COPYRIGHT         NOTICES           pkg5.repository   publisher         README-iso.txt
The repository rebuild and verification can take some time, but the repository content is retrievable after you get the "Repository can be found in" message.
If you receive a message that the repository verification could not be done, ensure that Oracle Solaris 11.1.7 or later is installed.
Example 2  Adding to an Existing Repository From a zip File In this example, the content of the repository zip files is added to the content in an existing package repository.
$ pkgrepo -s /var/share/pkgrepos/solaris info
PUBLISHER PACKAGES STATUS           UPDATED
solaris   4764     online           2014-03-18T05:30:57.221021Z
$ ./install-repo.ksh -d /var/share/pkgrepos/solaris -c -v -I
IPS repository exists at destination /var/share/pkgrepos/solaris
Current version: 0.175.2.0.0.35.0
Do you want to add to this repository? (y/n) y
Comparing digests of downloaded files...done. Digests match.
Uncompressing sol-11_3-ga-repo-1of4.zip...done.
Uncompressing sol-11_3-ga-repo-2of4.zip...done.
Uncompressing sol-11_3-ga-repo-3of4.zip...done.
Uncompressing sol-11_3-ga-repo-4of4.zip...done.
Repository can be found in /var/share/pkgrepos/solaris.
Initiating repository rebuild.
Initiating repository verification.
Building ISO image...done.
ISO image can be found at:
/tank/downloads/sol-11_3-ga-repo.iso
Instructions for using the ISO image can be found at:
/var/share/pkgrepos/solaris/README-repo-iso.txt
$ pkgrepo -s /var/share/pkgrepos/solaris info
PUBLISHER PACKAGES STATUS           UPDATED
solaris   4768     online           2016-06-02T18:11:55.640930Z

Sunday 22 December 2019

Start/Stop OHS Instance

Start/Stop OHS Instance

Start and stop scripts for the node manager and OHS instance are created under the domain home. The typical start and stop sequences are shown below.
# Start
nohup $DOMAIN_HOME/bin/startNodeManager.sh > /dev/null 2>&1 &
$DOMAIN_HOME/bin/startComponent.sh ohs1

#Stop
$DOMAIN_HOME/bin/stopComponent.sh ohs1
$DOMAIN_HOME/bin/stopNodeManager.sh
It should now be possible to start and stop the OHS instance with the scripts created earlier in the setup section.
~/scripts/start_all.sh
~/scripts/stop_all.sh

Important Files

There are a number of important config files, but the ones you are most likely to visit are the following.
$INSTANCE_HOME/httpd.conf
$INSTANCE_HOME/ssl.conf
$INSTANCE_HOME/mod_wl_ohs.conf
You can diagnose issues by checking the log files under the "$DOMAIN_HOME/servers/ohs1/logs/" directory.
$DOMAIN_HOME/servers/ohs1/logs/admin_log
$DOMAIN_HOME/servers/ohs1/logs/access_log
$DOMAIN_HOME/servers/ohs1/logs/ohs1.log

Wednesday 18 December 2019

route config for solaris11

Configuring Persistent Routes

Because the /etc/defaultrouter file is deprecated in Oracle Solaris 11, you can no longer manage routes (default or otherwise) by using this file. Using the route command is the only way that you can manually add a route to a system. To make the changes persist across reboots, use the –p option with the route command.
# route -p add default ip-address
For example, you would add a route to network 203.0.113.0, which has its gateway as the border router, as follows:
# route -p add -net 203.0.113.0/24 -gateway 203.0.113.150
add net 203.0.113.0: gateway 203.0.113.150
View routes that were created by the using the previous command as follows:
# route -p show
Also, note that after an installation, you can no longer determine a system's default route by checking the /etc/defaultrouter file. To display the currently active routes on a system, use the netstat command with the following options:
# netstat -rn

Sunday 1 December 2019

partition find for linux

Find partition for lunix
================
 lsblk -io KNAME, TYPE, SIZE, MODEl
 fdisk -l
  975  df -kh
  976  fdisk -l
  977  lsblk -io KNAME, TYPE, SIZE, MODEl
  978  lsblk -io NAME, TYPE, SIZE, MODEl
  979  lsblk -io  TYPE, SIZE, MODEl
  980  lsblk -io
  981  lsblk -all
  982  lsblk -io NAME, SIZE, TYPE,
  983  lsblk -io NAME SIZE TYPE MOUNTPOINT
  984  lsblk -al NAME SIZE TYPE MOUNTPOINT
  985  lsblk -all
  986  lshw -class disk
  987  lshw  disk
  988  lshw
  989  ls
  990  hwinfo --disk
============
  lsblk -o name,mountpoint

 output result:
lsblk -o name,mountpoint
NAME                 MOUNTPOINT
sda
├─sda1               /boot
├─sda2               /tmp
├─sda3               /usr
├─sda4
├─sda5               [SWAP]
├─sda6               /var
└─sda7               /
sdb
├─sdb1
└─mpathh (dm-3)
  └─mpathhp1 (dm-6)  /u01
sdc
├─sdc1
└─mpathg (dm-1)
  └─mpathgp1 (dm-4)  /u03
sdd
├─sdd1
└─mpathh (dm-3)
  └─mpathhp1 (dm-6)  /u01
sde
├─sde1
└─mpathg (dm-1)
  └─mpathgp1 (dm-4)  /u03
sdf
├─sdf1
└─mpathf (dm-0)
  └─mpathfp1 (dm-2)  /u02
sdg
├─sdg1
└─mpathi (dm-5)
  └─mpathip1 (dm-7)  /u04
sdh
├─sdh1
└─mpathf (dm-0)
  └─mpathfp1 (dm-2)  /u02
sdi
├─sdi1
└─mpathi (dm-5)
  └─mpathip1 (dm-7)  /u04
sdj
├─sdj1
└─mpathh (dm-3)
  └─mpathhp1 (dm-6)  /u01
sdk
├─sdk1
└─mpathg (dm-1)
  └─mpathgp1 (dm-4)  /u03
sdl
├─sdl1
└─mpathh (dm-3)
  └─mpathhp1 (dm-6)  /u01
sdm
├─sdm1
└─mpathg (dm-1)
  └─mpathgp1 (dm-4)  /u03
sdn
├─sdn1
└─mpathf (dm-0)
  └─mpathfp1 (dm-2)  /u02
sdo
├─sdo1
└─mpathi (dm-5)
  └─mpathip1 (dm-7)  /u04
sdp
├─sdp1
└─mpathf (dm-0)
  └─mpathfp1 (dm-2)  /u02
sdq
├─sdq1
└─mpathi (dm-5)
  └─mpathip1 (dm-7)  /u04
sdr
├─sdr1
└─mpathh (dm-3)
  └─mpathhp1 (dm-6)  /u01
sds
├─sds1
└─mpathg (dm-1)
  └─mpathgp1 (dm-4)  /u03
sdt
├─sdt1
└─mpathh (dm-3)
  └─mpathhp1 (dm-6)  /u01
sdu
├─sdu1
└─mpathg (dm-1)
  └─mpathgp1 (dm-4)  /u03
sdv
├─sdv1
└─mpathf (dm-0)
  └─mpathfp1 (dm-2)  /u02
sdw
├─sdw1
└─mpathi (dm-5)
  └─mpathip1 (dm-7)  /u04
sdx
├─sdx1
└─mpathf (dm-0)
  └─mpathfp1 (dm-2)  /u02
sdy
├─sdy1
└─mpathi (dm-5)
  └─mpathip1 (dm-7)  /u04
sdz
├─sdz1
└─mpathh (dm-3)
  └─mpathhp1 (dm-6)  /u01
sr0
sdaa
├─sdaa1
└─mpathg (dm-1)
  └─mpathgp1 (dm-4)  /u03
sdab
├─sdab1
└─mpathh (dm-3)
  └─mpathhp1 (dm-6)  /u01
sdac
├─sdac1
└─mpathg (dm-1)
  └─mpathgp1 (dm-4)  /u03
sdad
├─sdad1
└─mpathf (dm-0)
  └─mpathfp1 (dm-2)  /u02
sdae
├─sdae1
└─mpathi (dm-5)
  └─mpathip1 (dm-7)  /u04
sdaf
├─sdaf1
└─mpathf (dm-0)
  └─mpathfp1 (dm-2)  /u02
sdag
├─sdag1
└─mpathi (dm-5)
  └─mpathip1 (dm-7)  /u04
sdah
├─sdah1
└─mpathj (dm-8)
  └─mpathjp1 (dm-10) /u05
sdai
├─sdai1
└─mpathj (dm-8)
  └─mpathjp1 (dm-10) /u05
sdaj
├─sdaj1
└─mpathk (dm-9)
  └─mpathkp1 (dm-11) /u06
sdak
├─sdak1
└─mpathk (dm-9)
  └─mpathkp1 (dm-11) /u06
sdal
├─sdal1
└─mpathj (dm-8)
  └─mpathjp1 (dm-10) /u05
sdam
├─sdam1
└─mpathj (dm-8)
  └─mpathjp1 (dm-10) /u05
sdbb
├─sdbb1
└─mpathl (dm-12)
  └─mpathlp1 (dm-14) /u07
sdan
├─sdan1
└─mpathk (dm-9)
  └─mpathkp1 (dm-11) /u06
sdbc
├─sdbc1
└─mpathl (dm-12)
  └─mpathlp1 (dm-14) /u07
sdao
├─sdao1
└─mpathk (dm-9)
  └─mpathkp1 (dm-11) /u06
sdap
├─sdap1
└─mpathj (dm-8)
  └─mpathjp1 (dm-10) /u05
sdbf
├─sdbf1
└─mpathl (dm-12)
  └─mpathlp1 (dm-14) /u07
sdaq
├─sdaq1
└─mpathj (dm-8)
  └─mpathjp1 (dm-10) /u05
sdbg
├─sdbg1
└─mpathl (dm-12)
  └─mpathlp1 (dm-14) /u07
sdar
├─sdar1
└─mpathk (dm-9)
  └─mpathkp1 (dm-11) /u06
sdas
├─sdas1
└─mpathk (dm-9)
  └─mpathkp1 (dm-11) /u06
sdat
├─sdat1
└─mpathj (dm-8)
  └─mpathjp1 (dm-10) /u05
sdbj
├─sdbj1
└─mpathl (dm-12)
  └─mpathlp1 (dm-14) /u07
sdau
├─sdau1
└─mpathj (dm-8)
  └─mpathjp1 (dm-10) /u05
sdbk
├─sdbk1
└─mpathl (dm-12)
  └─mpathlp1 (dm-14) /u07
sdav
├─sdav1
└─mpathk (dm-9)
  └─mpathkp1 (dm-11) /u06
sdca
├─sdca1
└─mpatho (dm-18)
  └─mpathop1 (dm-19)
sdaw
├─sdaw1
└─mpathk (dm-9)
  └─mpathkp1 (dm-11) /u06
sdcb
├─sdcb1
└─mpatho (dm-18)
  └─mpathop1 (dm-19)
sdax
├─sdax1
└─mpathl (dm-12)
  └─mpathlp1 (dm-14) /u07
sdbn
├─sdbn1
└─mpathn (dm-16)
  └─mpathnp1 (dm-17) /u09
sdcc
├─sdcc1
└─mpatho (dm-18)
  └─mpathop1 (dm-19)
sday
├─sday1
└─mpathl (dm-12)
  └─mpathlp1 (dm-14) /u07
sdbo
├─sdbo1
└─mpathn (dm-16)
  └─mpathnp1 (dm-17) /u09
sdcd
└─mpathp (dm-20)
  └─mpathpp1 (dm-21) /archivelog
sdce
└─mpathp (dm-20)
  └─mpathpp1 (dm-21) /archivelog
sdbp
├─sdbp1
└─mpathn (dm-16)
  └─mpathnp1 (dm-17) /u09
sdcf
└─mpathp (dm-20)
  └─mpathpp1 (dm-21) /archivelog
sdbq
├─sdbq1
└─mpathn (dm-16)
  └─mpathnp1 (dm-17) /u09
sdcg
└─mpathp (dm-20)
  └─mpathpp1 (dm-21) /archivelog
sdbr
├─sdbr1
└─mpathn (dm-16)
  └─mpathnp1 (dm-17) /u09
sdch
└─mpathp (dm-20)
  └─mpathpp1 (dm-21) /archivelog
sdbs
├─sdbs1
└─mpathn (dm-16)
  └─mpathnp1 (dm-17) /u09
sdci
└─mpathp (dm-20)
  └─mpathpp1 (dm-21) /archivelog
sdbt
├─sdbt1
└─mpathn (dm-16)
  └─mpathnp1 (dm-17) /u09
sdcj
└─mpathp (dm-20)
  └─mpathpp1 (dm-21) /archivelog
sdbu
├─sdbu1
└─mpathn (dm-16)
  └─mpathnp1 (dm-17) /u09
sdck
└─mpathp (dm-20)
  └─mpathpp1 (dm-21) /archivelog
sdbv
├─sdbv1
└─mpatho (dm-18)
  └─mpathop1 (dm-19)
sdbw
├─sdbw1
└─mpatho (dm-18)
  └─mpathop1 (dm-19)
sdbx
├─sdbx1
└─mpatho (dm-18)
  └─mpathop1 (dm-19)
sdby
├─sdby1
└─mpatho (dm-18)
  └─mpathop1 (dm-19)
sdbz
├─sdbz1
└─mpatho (dm-18)
  └─mpathop1 (dm-19)
mpathm (dm-13)
===================
 lsblk -o name,size,mountpoint
NAME                   SIZE MOUNTPOINT
sda                    1.1T
├─sda1                 500M /boot
├─sda2                 200G /tmp
├─sda3                 200G /usr
├─sda4                   1K
├─sda5                 128G [SWAP]
├─sda6                 100G /var
└─sda7               488.8G /
sdb                    500G
├─sdb1                 500G
└─mpathh (dm-3)        500G
  └─mpathhp1 (dm-6)    500G /u01
sdc                    500G
├─sdc1                 500G
└─mpathg (dm-1)        500G
  └─mpathgp1 (dm-4)    500G /u03
sdd                    500G
├─sdd1                 500G
└─mpathh (dm-3)        500G
  └─mpathhp1 (dm-6)    500G /u01
sde                    500G
├─sde1                 500G
└─mpathg (dm-1)        500G
  └─mpathgp1 (dm-4)    500G /u03
sdf                      1T
├─sdf1                1024G
└─mpathf (dm-0)          1T
  └─mpathfp1 (dm-2)   1024G /u02
sdg                    600G
├─sdg1                 600G
└─mpathi (dm-5)        600G
  └─mpathip1 (dm-7)    600G /u04
sdh                      1T
├─sdh1                1024G
└─mpathf (dm-0)          1T
  └─mpathfp1 (dm-2)   1024G /u02
sdi                    600G
├─sdi1                 600G
└─mpathi (dm-5)        600G
  └─mpathip1 (dm-7)    600G /u04
sdj                    500G
├─sdj1                 500G
└─mpathh (dm-3)        500G
  └─mpathhp1 (dm-6)    500G /u01
sdk                    500G
├─sdk1                 500G
└─mpathg (dm-1)        500G
  └─mpathgp1 (dm-4)    500G /u03
sdl                    500G
├─sdl1                 500G
└─mpathh (dm-3)        500G
  └─mpathhp1 (dm-6)    500G /u01
sdm                    500G
├─sdm1                 500G
└─mpathg (dm-1)        500G
  └─mpathgp1 (dm-4)    500G /u03
sdn                      1T
├─sdn1                1024G
└─mpathf (dm-0)          1T
  └─mpathfp1 (dm-2)   1024G /u02
sdo                    600G
├─sdo1                 600G
└─mpathi (dm-5)        600G
  └─mpathip1 (dm-7)    600G /u04
sdp                      1T
├─sdp1                1024G
└─mpathf (dm-0)          1T
  └─mpathfp1 (dm-2)   1024G /u02
sdq                    600G
├─sdq1                 600G
└─mpathi (dm-5)        600G
  └─mpathip1 (dm-7)    600G /u04
sdr                    500G
├─sdr1                 500G
└─mpathh (dm-3)        500G
  └─mpathhp1 (dm-6)    500G /u01
sds                    500G
├─sds1                 500G
└─mpathg (dm-1)        500G
  └─mpathgp1 (dm-4)    500G /u03
sdt                    500G
├─sdt1                 500G
└─mpathh (dm-3)        500G
  └─mpathhp1 (dm-6)    500G /u01
sdu                    500G
├─sdu1                 500G
└─mpathg (dm-1)        500G
  └─mpathgp1 (dm-4)    500G /u03
sdv                      1T
├─sdv1                1024G
└─mpathf (dm-0)          1T
  └─mpathfp1 (dm-2)   1024G /u02
sdw                    600G
├─sdw1                 600G
└─mpathi (dm-5)        600G
  └─mpathip1 (dm-7)    600G /u04
sdx                      1T
├─sdx1                1024G
└─mpathf (dm-0)          1T
  └─mpathfp1 (dm-2)   1024G /u02
sdy                    600G
├─sdy1                 600G
└─mpathi (dm-5)        600G
  └─mpathip1 (dm-7)    600G /u04
sdz                    500G
├─sdz1                 500G
└─mpathh (dm-3)        500G
  └─mpathhp1 (dm-6)    500G /u01
sr0                   1024M
sdaa                   500G
├─sdaa1                500G
└─mpathg (dm-1)        500G
  └─mpathgp1 (dm-4)    500G /u03
sdab                   500G
├─sdab1                500G
└─mpathh (dm-3)        500G
  └─mpathhp1 (dm-6)    500G /u01
sdac                   500G
├─sdac1                500G
└─mpathg (dm-1)        500G
  └─mpathgp1 (dm-4)    500G /u03
sdad                     1T
├─sdad1               1024G
└─mpathf (dm-0)          1T
  └─mpathfp1 (dm-2)   1024G /u02
sdae                   600G
├─sdae1                600G
└─mpathi (dm-5)        600G
  └─mpathip1 (dm-7)    600G /u04
sdaf                     1T
├─sdaf1               1024G
└─mpathf (dm-0)          1T
  └─mpathfp1 (dm-2)   1024G /u02
sdag                   600G
├─sdag1                600G
└─mpathi (dm-5)        600G
  └─mpathip1 (dm-7)    600G /u04
sdah                     1T
├─sdah1               1024G
└─mpathj (dm-8)          1T
  └─mpathjp1 (dm-10)  1024G /u05
sdai                     1T
├─sdai1               1024G
└─mpathj (dm-8)          1T
  └─mpathjp1 (dm-10)  1024G /u05
sdaj                   500G
├─sdaj1                500G
└─mpathk (dm-9)        500G
  └─mpathkp1 (dm-11)   500G /u06
sdak                   500G
├─sdak1                500G
└─mpathk (dm-9)        500G
  └─mpathkp1 (dm-11)   500G /u06
sdal                     1T
├─sdal1               1024G
└─mpathj (dm-8)          1T
  └─mpathjp1 (dm-10)  1024G /u05
sdam                     1T
├─sdam1               1024G
└─mpathj (dm-8)          1T
  └─mpathjp1 (dm-10)  1024G /u05
sdbb                   500G
├─sdbb1                500G
└─mpathl (dm-12)       500G
  └─mpathlp1 (dm-14)   500G /u07
sdan                   500G
├─sdan1                500G
└─mpathk (dm-9)        500G
  └─mpathkp1 (dm-11)   500G /u06
sdbc                   500G
├─sdbc1                500G
└─mpathl (dm-12)       500G
  └─mpathlp1 (dm-14)   500G /u07
sdao                   500G
├─sdao1                500G
└─mpathk (dm-9)        500G
  └─mpathkp1 (dm-11)   500G /u06
sdap                     1T
├─sdap1               1024G
└─mpathj (dm-8)          1T
  └─mpathjp1 (dm-10)  1024G /u05
sdbf                   500G
├─sdbf1                500G
└─mpathl (dm-12)       500G
  └─mpathlp1 (dm-14)   500G /u07
sdaq                     1T
├─sdaq1               1024G
└─mpathj (dm-8)          1T
  └─mpathjp1 (dm-10)  1024G /u05
sdbg                   500G
├─sdbg1                500G
└─mpathl (dm-12)       500G
  └─mpathlp1 (dm-14)   500G /u07
sdar                   500G
├─sdar1                500G
└─mpathk (dm-9)        500G
  └─mpathkp1 (dm-11)   500G /u06
sdas                   500G
├─sdas1                500G
└─mpathk (dm-9)        500G
  └─mpathkp1 (dm-11)   500G /u06
sdat                     1T
├─sdat1               1024G
└─mpathj (dm-8)          1T
  └─mpathjp1 (dm-10)  1024G /u05
sdbj                   500G
├─sdbj1                500G
└─mpathl (dm-12)       500G
  └─mpathlp1 (dm-14)   500G /u07
sdau                     1T
├─sdau1               1024G
└─mpathj (dm-8)          1T
  └─mpathjp1 (dm-10)  1024G /u05
sdbk                   500G
├─sdbk1                500G
└─mpathl (dm-12)       500G
  └─mpathlp1 (dm-14)   500G /u07
sdav                   500G
├─sdav1                500G
└─mpathk (dm-9)        500G
  └─mpathkp1 (dm-11)   500G /u06
sdca                     2T
├─sdca1                  2T
└─mpatho (dm-18)         2T
  └─mpathop1 (dm-19)     2T
sdaw                   500G
├─sdaw1                500G
└─mpathk (dm-9)        500G
  └─mpathkp1 (dm-11)   500G /u06
sdcb                     2T
├─sdcb1                  2T
└─mpatho (dm-18)         2T
  └─mpathop1 (dm-19)     2T
sdax                   500G
├─sdax1                500G
└─mpathl (dm-12)       500G
  └─mpathlp1 (dm-14)   500G /u07
sdbn                   500G
├─sdbn1                500G
└─mpathn (dm-16)       500G
  └─mpathnp1 (dm-17)   500G /u09
sdcc                     2T
├─sdcc1                  2T
└─mpatho (dm-18)         2T
  └─mpathop1 (dm-19)     2T
sday                   500G
├─sday1                500G
└─mpathl (dm-12)       500G
  └─mpathlp1 (dm-14)   500G /u07
sdbo                   500G
├─sdbo1                500G
└─mpathn (dm-16)       500G
  └─mpathnp1 (dm-17)   500G /u09
sdcd                     1T
└─mpathp (dm-20)         1T
  └─mpathpp1 (dm-21)  1024G /archivelog
sdce                     1T
└─mpathp (dm-20)         1T
  └─mpathpp1 (dm-21)  1024G /archivelog
sdbp                   500G
├─sdbp1                500G
└─mpathn (dm-16)       500G
  └─mpathnp1 (dm-17)   500G /u09
sdcf                     1T
└─mpathp (dm-20)         1T
  └─mpathpp1 (dm-21)  1024G /archivelog
sdbq                   500G
├─sdbq1                500G
└─mpathn (dm-16)       500G
  └─mpathnp1 (dm-17)   500G /u09
sdcg                     1T
└─mpathp (dm-20)         1T
  └─mpathpp1 (dm-21)  1024G /archivelog
sdbr                   500G
├─sdbr1                500G
└─mpathn (dm-16)       500G
  └─mpathnp1 (dm-17)   500G /u09
sdch                     1T
└─mpathp (dm-20)         1T
  └─mpathpp1 (dm-21)  1024G /archivelog
sdbs                   500G
├─sdbs1                500G
└─mpathn (dm-16)       500G
  └─mpathnp1 (dm-17)   500G /u09
sdci                     1T
└─mpathp (dm-20)         1T
  └─mpathpp1 (dm-21)  1024G /archivelog
sdbt                   500G
├─sdbt1                500G
└─mpathn (dm-16)       500G
  └─mpathnp1 (dm-17)   500G /u09
sdcj                     1T
└─mpathp (dm-20)         1T
  └─mpathpp1 (dm-21)  1024G /archivelog
sdbu                   500G
├─sdbu1                500G
└─mpathn (dm-16)       500G
  └─mpathnp1 (dm-17)   500G /u09
sdck                     1T
└─mpathp (dm-20)         1T
  └─mpathpp1 (dm-21)  1024G /archivelog
sdbv                     2T
├─sdbv1                  2T
└─mpatho (dm-18)         2T
  └─mpathop1 (dm-19)     2T
sdbw                     2T
├─sdbw1                  2T
└─mpatho (dm-18)         2T
  └─mpathop1 (dm-19)     2T
sdbx                     2T
├─sdbx1                  2T
└─mpatho (dm-18)         2T
  └─mpathop1 (dm-19)     2T
sdby                     2T
├─sdby1                  2T
└─mpatho (dm-18)         2T
  └─mpathop1 (dm-19)     2T
sdbz                     2T
├─sdbz1                  2T
└─mpatho (dm-18)         2T
  └─mpathop1 (dm-19)     2T
mpathm (dm-13)           1T
You have mail in /var/spool/mail/root
=============================


Tuesday 26 November 2019

SAN Switch update

firmwaredownload example:

switch:admin> firmwaredownload
Server Name or IP Address: IP.TO.SCP.SERVER
User Name: username
File Name: /path/to/v6.2.2e
Network Protocol(1-auto-select, 2-FTP, 3-SCP) [1]: 3
Password:
Server IP: IP.TO.SCP.SERVER, Protocol IPv4
Checking system settings for firmwaredownload...
System settings check passed.
You can run firmwaredownloadstatus to get the status
 of this command.
This command will cause a warm/non-disruptive boot on the switch,
 but will require that existing telnet, secure telnet or SSH sessions
 be restarted.
Do you want to continue [Y]: y
 Firmware is being downloaded to the switch. This step may take up to 30 minutes.
 Preparing for firmwaredownload...
 Start to install packages...
 dir ##################################################
 [[lots of these for all packets]] ##################################################
 [[also stuff like these are seen many times:]]
 warning: /etc/fabos/pki/switch.0.rootcrt created as /etc/fabos/pki/switch.0.rootcrt.rpmnew
 kernel-module-ipsec ##################################################
 Removing unneeded files, please wait ...
 Finished removing unneeded files.
All packages have been downloaded successfully.
 Firmware has been downloaded to the secondary partition of the switch.
 HA Rebooting ...

Thursday 10 October 2019

Windows NFS

Install the NFS Client (Services for NFS)

The first thing we need to do is install the NFS Client which can be done by following the steps below:
Step 1: Open Programs and Features.
Windows 10: Open Programs and Features
Step 2: Click Turn Windows features on or off.
Turn Windows 10 Features On or Off
Step 3: Scroll down and check the option Services for NFS, then click OK.
Windows 10: Enable Services for NFS
Step 4: Once installed, click Close and exit back to the desktop.

Enable Write Permissions for the Anonymous User

With the default options you will only have read permissions when mounting a UNIX share using the anonymous user. We can give the anonymous user write permissions by changing the UID and GID that it uses to mount the share.
The image below shows the a share mounted using the default settings.
Windows 10: NFS Mount Command
To change the UID and GID we need to make a simple change to the Windows registry by performing the following steps:
  1. Open regedit by typing it in the search box end pressing Enter.
  2. Browse to HKEY_LOCAL_MACHINE\SOFTWARE\Microsoft\ClientForNFS\CurrentVersion\Default.
  3. Create a new New DWORD (32-bit) Value inside the Default folder named AnonymousUid and assign the UID found on the UNIX directory as shared by the NFS system.
  4. Create a new New DWORD (32-bit) Value inside the Default folder named AnonymousGid and assign the GID found on the UNIX directory as shared by the NFS system. Windows 10: Regedit NFS AnonymousUid and AnonymousGid
  5. Restart the NFS client or reboot the machine to apply the changes.
The output of the mount command should now look like this:
Local    Remote                                 Properties
-------------------------------------------------------------------------------
Z:       \\10.1.1.211\mnt\vms                   UID=0, GID=0
                                                rsize=1048576, wsize=1048576
                                                mount=soft, timeout=1.6
                                                retry=1, locking=yes
                                                fileaccess=755, lang=ANSI
                                                casesensitive=no
                                                sec=sys
Notice the 0 value applied to the UID and GID. This means the share is mounted using the root user.

How to Mount an NFS Share

Assuming your NAS device is on the same network as your Windows machine and the IP address of the device is 10.1.1.211, the following command will mount a share on the NFS system at /mnt/vms.
C:\Users\windows&gt;mount -o anon \\10.1.1.211\mnt\vms Z:
Z: is now successfully connected to \\10.1.1.211\mnt\vms

The command completed successfully.
The share is now mounted and we can access the data by navigating to the Z: drive.
Mounted NFS Share in Windows 10
That’s it, we can now write to the NAS device. Although, I did notice that trying to open the share for the first time takes a long time.

Tuesday 24 September 2019

install and configure FreeIPA on Red Hat Linux

server's /etc/hosts file pointing to itself:
 
# cat /etc/hosts
127.0.0.1   localhost localhost.localdomain localhost4 localhost4.localdomain4
::1         localhost localhost.localdomain localhost6 localhost6.localdomain6

192.168.122.147 rhel7.ipa.linuxconfig.org rhel7
 
 
And the hostname provided in the hosts file MUST be the FQDN of the machine.

 # hostname
rhel7.ipa.linuxconfig.org
 This is an important step, don't miss it. The same hostname needed in the network file:

 # grep HOSTNAME /etc/sysconfig/network
HOSTNAME=rhel7.ipa.linuxconfig.org 
 
yum command will do: 

 # yum install ipa-server ipa-server-dns
 On a base install, yum will provide a long list of 
dependencies, including Apache Tomcat, Apache Httpd, 389-ds (the LDAP 
server), and so on. After yum finishes, open the ports needed on the 
firewall:

 # firewall-cmd --add-service=freeipa-ldap
success
# firewall-cmd --add-service=freeipa-ldap --permanent
success 
 

Setup

# ipa-server-install

The log file for this installation can be found in /var/log/ipaserver-install.log
==============================================================================
This program will set up the IPA Server.

This includes:
  * Configure a stand-alone CA (dogtag) for certificate management
  * Configure the Network Time Daemon (ntpd)
  * Create and configure an instance of Directory Server
  * Create and configure a Kerberos Key Distribution Center (KDC)
  * Configure Apache (httpd)
  * Configure the KDC to enable PKINIT

To accept the default shown in brackets, press the Enter key.

WARNING: conflicting time&date synchronization service 'chronyd' will be disabled
in favor of ntpd

## we'll use the integrated DNS server
Do you want to configure integrated DNS (BIND)? [no]: yes

Enter the fully qualified domain name of the computer
on which you're setting up server software. Using the form
<hostname>.<domainname>
Example: master.example.com.

## pressing 'enter' means we accept the default in the bracelets
## this is the reason we set up the proper FDQN for the host
Server host name [rhel7.ipa.linuxconfig.org]:       

Warning: skipping DNS resolution of host rhel7.ipa.linuxconfig.org
The domain name has been determined based on the host name.

## now we don't have to type/paste domain name
## and the installer don’t need to try setting the host’s name
Please confirm the domain name [ipa.linuxconfig.org]:      
           
The kerberos protocol requires a Realm name to be defined.
This is typically the domain name converted to uppercase.

## the Kerberos realm is mapped from the domain name
Please provide a realm name [IPA.LINUXCONFIG.ORG]:      
Certain directory server operations require an administrative user.
This user is referred to as the Directory Manager and has full access
to the Directory for system management tasks and will be added to the
instance of directory server created for IPA.
The password must be at least 8 characters long.

## Directory Manager user is for the low-level operations, like creating replicas
Directory Manager password: 
## use a very strong password in a production environment!      
Password (confirm):          

The IPA server requires an administrative user, named 'admin'.
This user is a regular system account used for IPA server administration.

## admin is the "root" of the FreeIPA system – but not the LDAP directory
IPA admin password:          
Password (confirm): 

Checking DNS domain ipa.linuxconfig.org., please wait ...
## we could setup forwarders, but this can be set later as well
Do you want to configure DNS forwarders? [yes]: no     
No DNS forwarders configured
Do you want to search for missing reverse zones? [yes]: no

The IPA Master Server will be configured with:
Hostname:       rhel7.ipa.linuxconfig.org
IP address(es): 192.168.122.147
Domain name:    ipa.linuxconfig.org
Realm name:     IPA.LINUXCONFIG.ORG

BIND DNS server will be configured to serve IPA domain with:
Forwarders:       No forwarders
Forward policy:   only
Reverse zone(s):  No reverse zone

Continue to configure the system with these values? [no]: yes

## at this point the installer will work on its own,
## and complete the process in a few minutes. The perfect time for coffee.
The following operations may take some minutes to complete.    
Please wait until the prompt is returned.      

Configuring NTP daemon (ntpd)
  [1/4]: stopping ntpd ...
The output of the installer is rather long, you can see as all components configured, restarted, and verified. At the end of the output, there some steps needed for full functionality, but not for the installation process itself.
... The ipa-client-install command was successful

==============================================================================
Setup complete

Next steps:
 1. You must make sure these network ports are open:
  TCP Ports:
    * 80, 443: HTTP/HTTPS
    * 389, 636: LDAP/LDAPS
    * 88, 464: kerberos
    * 53: bind
  UDP Ports:
    * 88, 464: kerberos
    * 53: bind
    * 123: ntp

 2. You can now obtain a kerberos ticket using the command: 'kinit admin'
    This ticket will allow you to use the IPA tools (e.g., ipa user-add)
    and the web user interface.

Be sure to back up the CA certificates stored in /root/cacert.p12
These files are required to create replicas. The password for these
files is the Directory Manager password
As the installer points out, be sure to backup the CA cert, and open additional needed ports on the firewall.

Now let's enable home directory creation on login:
# authconfig --enablemkhomedir –-update 
 

Verification

We can start testing if we have a working service stack. Let's test if we can get a Kerberos ticket for the admin user (with the password given to the admin user during install): # kinit admin Password for admin@IPA.LINUXCONFIG.ORG : # klist Ticket cache: KEYRING:persistent:0:0 Default principal: admin@IPA.LINUXCONFIG.ORG Valid starting Expires Service principal 2018-06-24 21.44.30 2018-06-25 21.44.28 krbtgt/IPA.LINUXCONFIG.ORG@IPA.LINUXCONFIG.ORG The host machine is enrolled into our new domain, and the default rules grant ssh access to the above-created admin user to all enrolled host. Let's test if these rules work as expected by opening ssh connection to localhost: # ssh admin@localhost Password: Creating home directory for admin. Last login: Sun Jun 24 21:41:57 2018 from localhost $ pwd /home/admin $ exit Let's check the status of the whole software stack:

# ipactl status Directory Service: RUNNING krb5kdc Service: RUNNING kadmin Service: RUNNING named Service: RUNNING httpd Service: RUNNING ipa-custodia Service: RUNNING ntpd Service: RUNNING pki-tomcatd Service: RUNNING ipa-otpd Service: RUNNING ipa-dnskeysyncd Service: RUNNING ipa: INFO: The ipactl command was successful And - with the Kerberos ticket acquired earlier - ask for information about the admin user using the CLI tool:

# ipa user-find admin -------------- 1 user matched -------------- User login: admin Last name: Administrator Home directory: /home/admin Login shell: /bin/bash Principal alias: admin@IPA.LINUXCONFIG.ORG UID: 630200000 GID: 630200000 Account disabled: False ---------------------------- Number of entries returned 1 ---------------------------- 

we installed a self-signed root certificate, the browser will warn us about it.

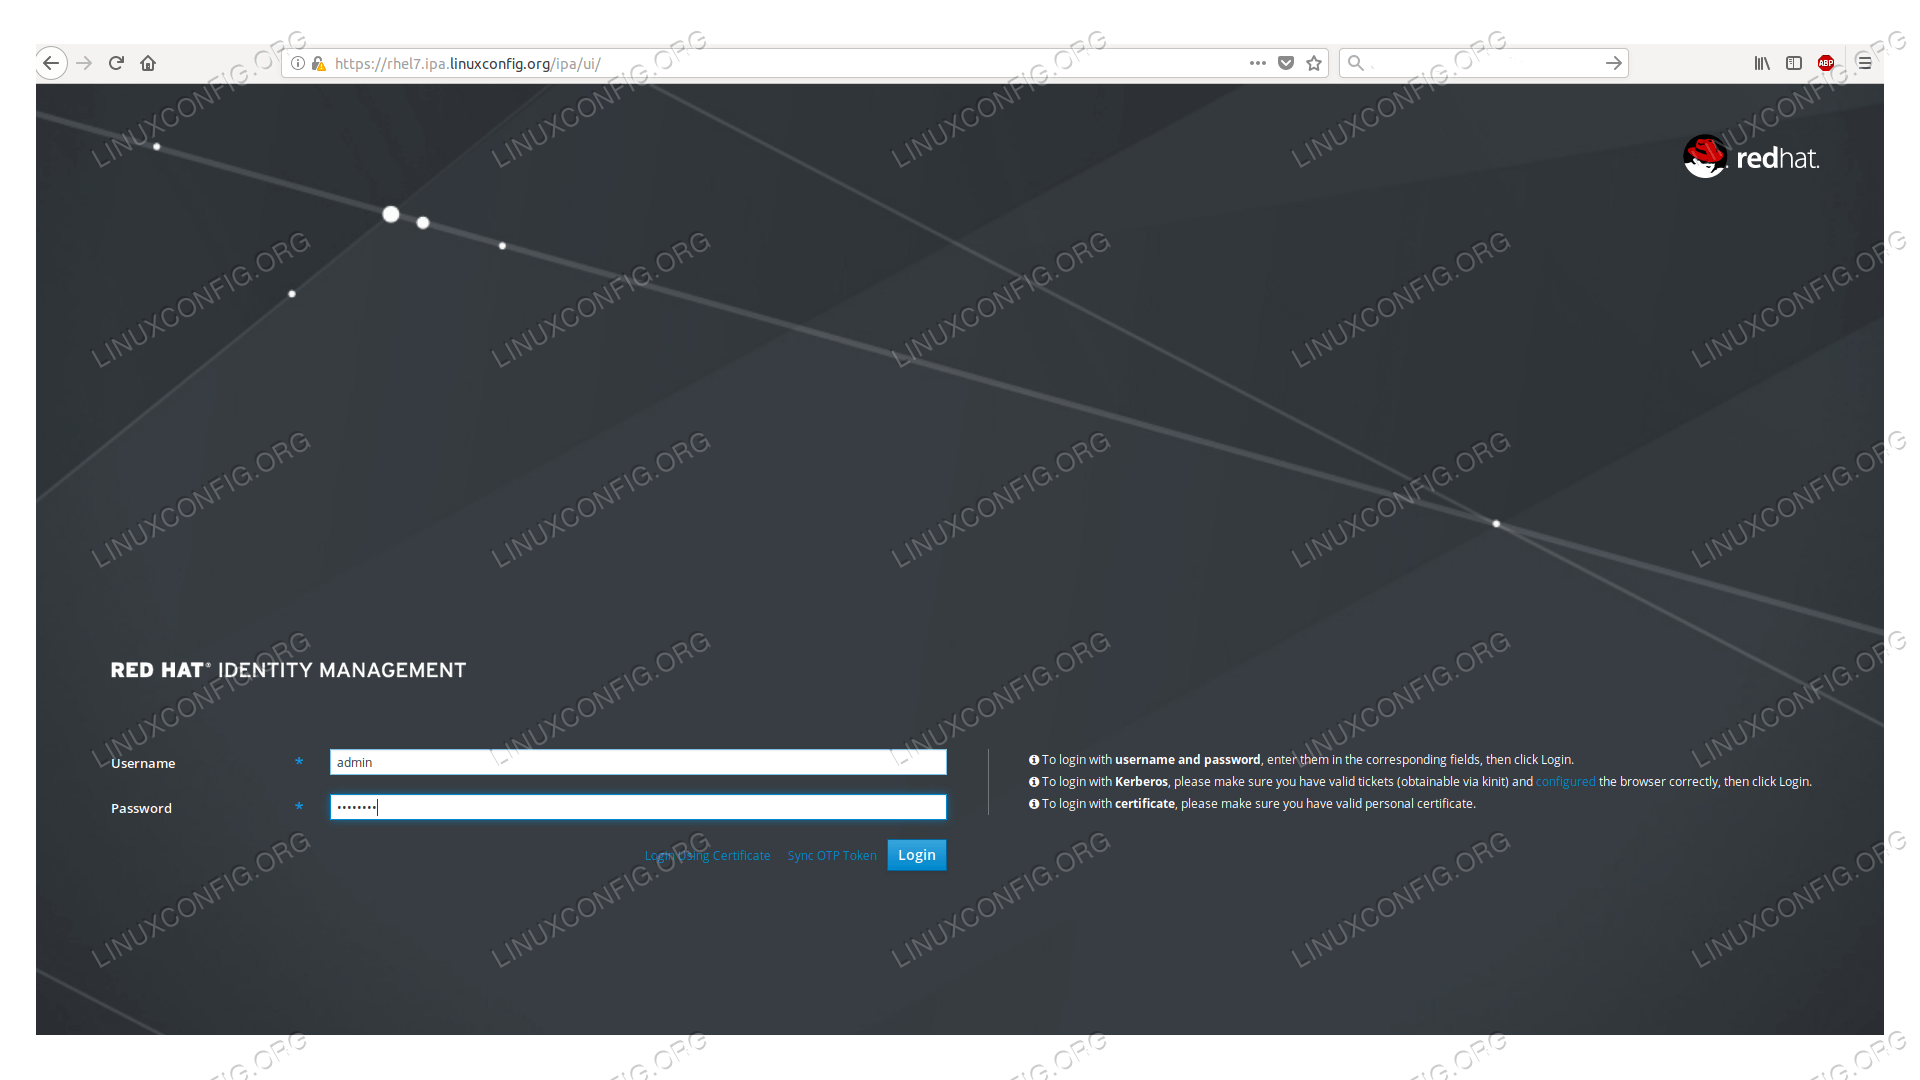
FreeIPA login page
Login page of the FreeIPA WUI
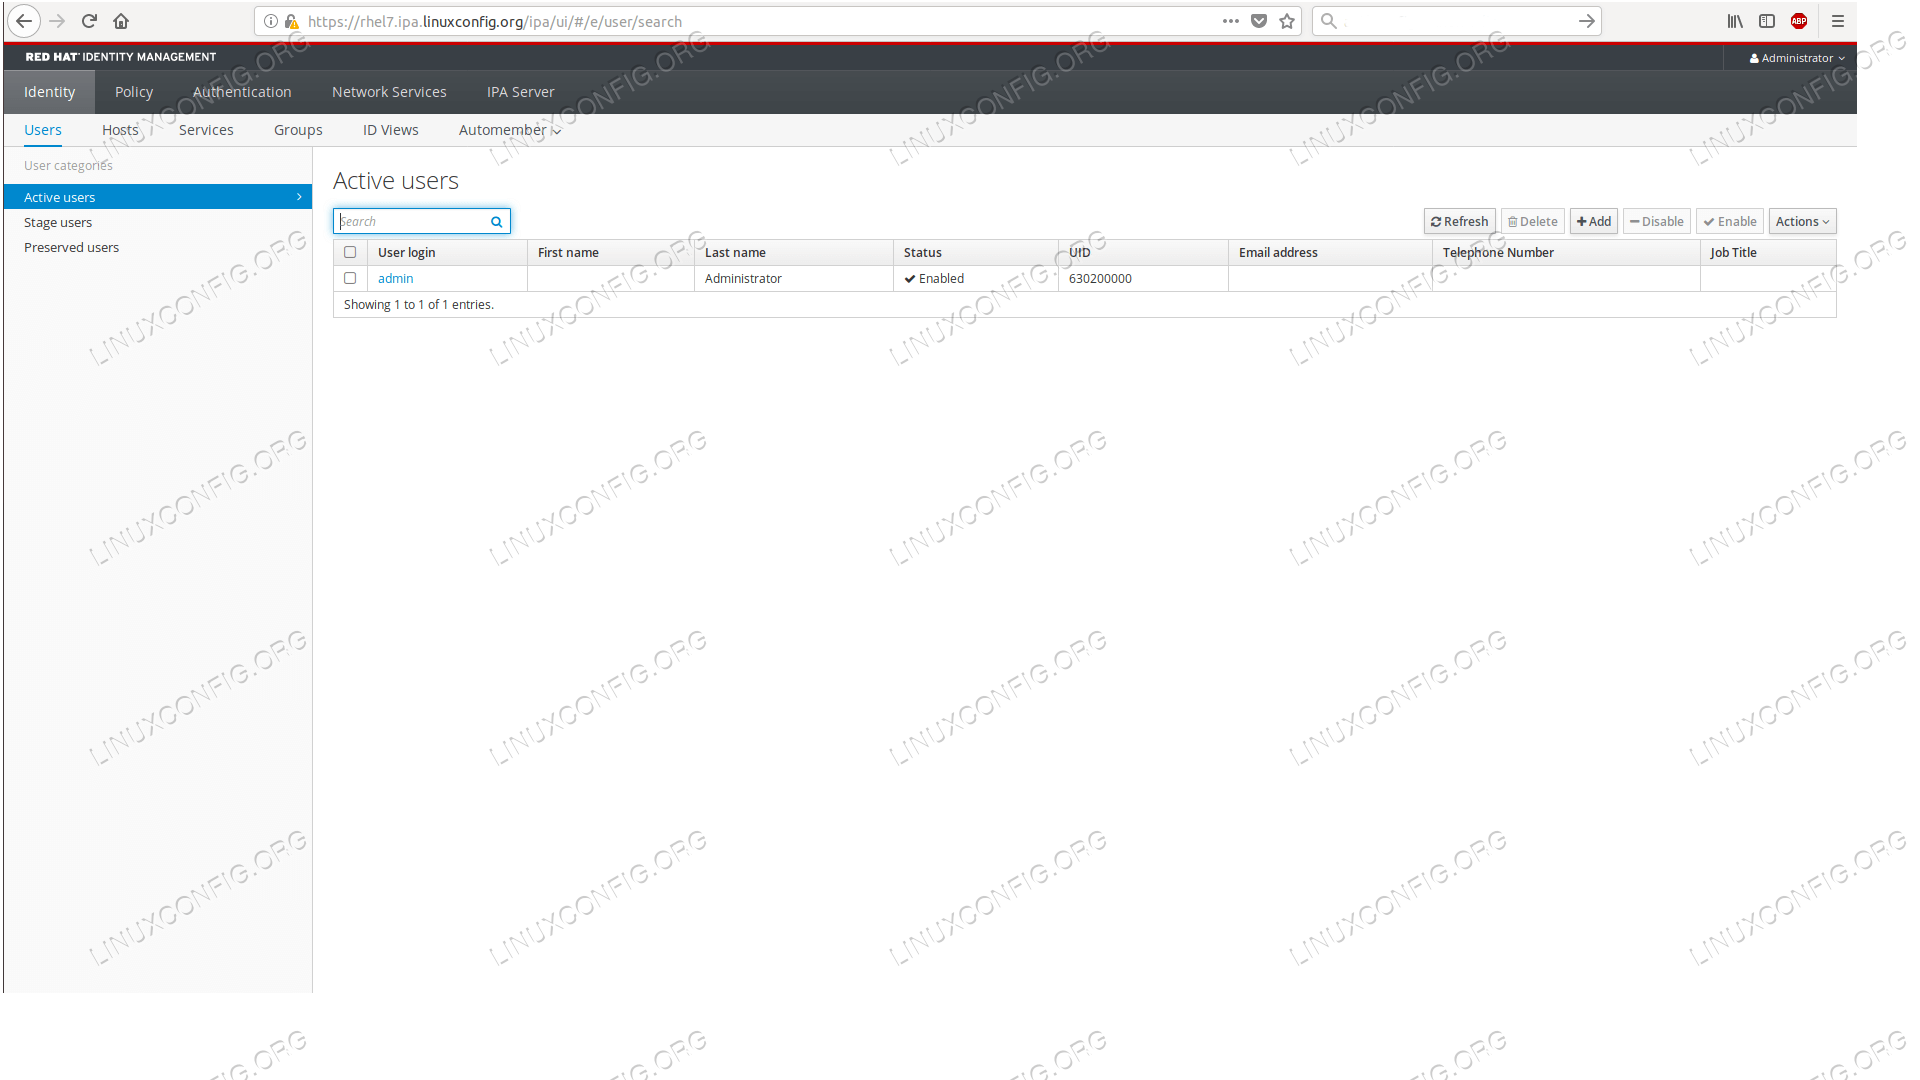
The default page after login shows the list of our users, where now only the admin user appears.

FreeIPA user list
The default page after login is the userlist in FreeIPA WUI


With this we completed our goal, we have a running FreeIPA server ready to be populated with users, hosts, certificates, and various rules.


Monday 16 September 2019

user Disable foe Linux


1. Lock the password


# usermod -L testuser
 
# passwd -l testuser
 

2. Expire the user account


# chage -E0 testuser

3. Changing the shell

# usermod -s /sbin/nologin [username]

Verify if the account is locked or disabled.

1. Check if the user account is locked.
Check for the flag *LK* in the below command output which indicates that the account is locked.
# passwd --status root
root *LK* 2017-07-19 0 45 7 -1 (Password set, SHA512 crypt.)
2. Check if the account has an expire date.
Check for the lines Password expires and Account expires to check if the account password is expired.
# chage -l root
Last password change                                    : Jul 19, 2017
Password expires                                        : Sep 02, 2017
Password inactive                                       : never
Account expires                                         : Sep 02, 2017
Minimum number of days between password change          : 0
Maximum number of days between password change          : 45
Number of days of warning before password expires       : 7
3. Check for non-interactive shell
Check if the user shell has been changed to a non-interactive shell like /sbin/nologin.
# grep ^root /etc/passwd
root:x:0:0:root:/root:/sbin/nologin

  ++++++++++++++++++++++++++++++++++++++++

Linux check user password expiration using chage

  1. Open the terminal application
  2. Type chage -l userName command to display password expiration information for Linux user account.
  3. The -l option passed to the change show account aging information.
  4. Check tom user’s password expiry time, run: sudo chage -l tom
Let us see some examples and usage information in details.

View account again information on Linux

To see account aging information such as expiry date and time, enter:
chage -l {userNameHere}
chage -l userNameHere
To see account aging info for usernamed vivek, enter:
$ chage -l vivek
Sample outputs:
Last password change     : Jan 10, 2012
Password expires     : never
Password inactive     : never
Account expires      : never
Minimum number of days between password change  : 0
Maximum number of days between password change  : 99999
Number of days of warning before password expires : 7
The above outputs indicates that password aging disabled.

Check the user account password expiry information on Linux

Let us try one more example:
$ sudo chage -l raj
Sample outputs:
Last password change     : May 21, 2012
Password expires     : Jun 20, 2012
Password inactive     : never
Account expires      : Jan 01, 2013
Minimum number of days between password change  : 7
Maximum number of days between password change  : 30
Number of days of warning before password expires : 7
It seems that user account scheduled to expire on 01/Jan/2013. You can use the grep command to filter out info too:
$ sudo chage -l raj | grep 'Password expires'

Change password expiry date

You can set the maximum number of days during which a password is valid. For example, make sure password is valid for 90 days for user named jerry:
sudo chage -M 90 jerry
sudo chage -l jerry

Please note that passing the number -1 will remove checking a password’s validity:
sudo chage -M -1 tom
You can also set the minimum number of days between password changes:
sudo chage -m 30 jerry
However, a value of zero indicates that the user may change his/her password at any time:
sudo chage -m 0 marlena

Set expire date

The syntax is:
sudo chage -E EXPIRE_DATE userName
One can set the date or number of days since January 1, 1970 on which the user’s account will no longer be accessible. The date may also be expressed in the format YYYY-MM-DD (or the format more mmonly used in your area). A user whose account is locked must contact the system administrator before being able to use the system again.
sudo chage -E 2020-03-31 sai
Passing the number -1 as the EXPIRE_DATE will remove an account expiration date:
sudo chage -E -1 tristan

Set warning for the user before password expires

Try using the following syntax to set the number of days of warning before a password change is required:
sudo chage -W WARN_DAYS userName
sudo chage -W 30 raj

The WARN_DAYS option is the number of days prior to the password expiring that a user will be warned his/her password is about to expire. Verify info with following command:
sudo chage -l raj
Linux Check User Password Expiration Date Time with chage


Thursday 13 June 2019

OSB

#obtool

 ob> lsuser --long username
ob> chuser --class oracle lashdown
ob> mkuser username --class admin --password "sia#2018" --givenname "username" --unixname root --unixgroup "root" --preauth OSB:username+rman+cmdline --ndmpuser no

Wednesday 29 May 2019

Displaying Fibre Channel Devices

Displaying Fibre Channel Devices

The commonly used commands for adding, removing, and displaying FC devices are as follows:
fcinfo – Collects and displays administrative information about FC-HBA ports on hosts, remote ports, and configured logical units. For more information, see the fcinfo(1M) man page. The following examples show the most common administration operations that can be performed by using the fcinfo command:
Example 1  Display Information of the HBA Ports and Their Link Statistics To list information of the HBA ports and their link statistics use the fcinfo hba-port -l command.
# fcinfo hba-port -l
HBA Port WWN: 2100000e1ec95100
        Port Mode: Initiator
        Port ID: 150300
        OS Device Name: /dev/cfg/c6
        Manufacturer: QLogic Corp.
        Model: 7023303
        Firmware Version: 8.05.00
        FCode/BIOS Version:  BIOS: 3.19; fcode: 4.02; EFI: 5.36;
        Serial Number: 463916R+1606293054
        Driver Name: qlc
        Driver Version: 161214-5.06a
        Type: N-port
        State: online
        Supported Speeds: 4Gb 8Gb 16Gb
        Current Speed: 8Gb
        Node WWN: 2000000e1ec95100
        Link Error Statistics:
                Link Failure Count: 0
                Loss of Sync Count: 0
                Loss of Signal Count: 0
                Primitive Seq Protocol Error Count: 0
                Invalid Tx Word Count: 0
                Invalid CRC Count: 0
        Max NPIV Ports: 253
        NPIV port list:
HBA Port WWN: 2100000e1ec95101
        Port Mode: Initiator
        Port ID: 20801
        OS Device Name: /dev/cfg/c7
        Manufacturer: QLogic Corp.
        Model: 7023303
        Firmware Version: 8.05.00
        FCode/BIOS Version:  BIOS: 3.19; fcode: 4.02; EFI: 5.36;
        Serial Number: 463916R+1606293054
        Driver Name: qlc
        Driver Version: 161214-5.06a
        Type: NL-port
        State: online
        Supported Speeds: 4Gb 8Gb 16Gb
        Current Speed: 8Gb
        Node WWN: 2000000e1ec95101
        Link Error Statistics:
                Link Failure Count: 0
                Loss of Sync Count: 0
                Loss of Signal Count: 0
                Primitive Seq Protocol Error Count: 0
                Invalid Tx Word Count: 37825
                Invalid CRC Count: 0
        Max NPIV Ports: 253
        NPIV port list:
Example 2  Display All The Remote Ports on All the HBAs To list all the remote ports on all the HBAs, use the fcinfo remote-port command.
# fcinfo remote-port
HBA Port WWN: 2100000e1ec95100
  Count of Remote Port(s): 4
    Remote Port WWN: 10000000c97ecedc
        Active FC4 Types: SCSI,IP
        SCSI Target: no
        Port ID: 150400
        Port Symbolic Name:
        Node WWN: 20000000c97ecedc
    Remote Port WWN: 21000024ff41d9a4
        Active FC4 Types: SCSI
        SCSI Target: no
        Port ID: 150200
        Port Symbolic Name: qlc(0,0)
        Node WWN: 20000024ff41d9a4
    Remote Port WWN: 201600a0b82a38bc
        Active FC4 Types: SCSI
        SCSI Target: yes
        Port ID: 150700
        Port Symbolic Name: SUN     CSM200_R        0660
        Node WWN: 200600a0b82a38bc
    Remote Port WWN: 21000024ff51bb4a
        Active FC4 Types: SCSI
        SCSI Target: yes
        Port ID: 150100
        Port Symbolic Name: qlt0,0
        Node WWN: 20000024ff51bb4a
HBA Port WWN: 2100000e1ec95101
  Count of Remote Port(s): 11
    Remote Port WWN: 10000000c9c07a6d
        Active FC4 Types: SCSI,IP
        SCSI Target: no
        Port ID: 20b00
        Port Symbolic Name:
        Node WWN: 20000000c9c07a6d
    Remote Port WWN: 21000024ff2cd75a
        Active FC4 Types: SCSI,IP
        SCSI Target: no
        Port ID: 20200
        Port Symbolic Name:
        Node WWN: 20000024ff2cd75a
    Remote Port WWN: 202200a0b85a8c82
        Active FC4 Types: SCSI
        SCSI Target: yes
        Port ID: 20400
        Port Symbolic Name: SUN     LCSM100_F       0735
        Node WWN: 200200a0b85a8c82
    Remote Port WWN: 21000024ff2cd75b
        Active FC4 Types: SCSI,IP
        SCSI Target: no
        Port ID: 20300
        Port Symbolic Name:
        Node WWN: 20000024ff2cd75b
    Remote Port WWN: 10000000c97ecedd
        Active FC4 Types: SCSI,IP
        SCSI Target: no
        Port ID: 20900
        Port Symbolic Name:
        Node WWN: 20000000c97ecedd
    Remote Port WWN: 202300a0b85a8c82
        Active FC4 Types: SCSI
        SCSI Target: yes
        Port ID: 20600
        Port Symbolic Name: SUN     LCSM100_F       0735
        Node WWN: 200200a0b85a8c82
    Remote Port WWN: 203200a0b85a8c82
        Active FC4 Types: SCSI
        SCSI Target: yes
        Port ID: 20700
        Port Symbolic Name: SUN     LCSM100_F       0735
        Node WWN: 200200a0b85a8c82
    Remote Port WWN: 2100001b321a45e5
        Active FC4 Types: SCSI,IP
        SCSI Target: no
        Port ID: 20100
        Port Symbolic Name:
        Node WWN: 2000001b321a45e5
    Remote Port WWN: 203300a0b85a8c82
        Active FC4 Types: SCSI
        SCSI Target: yes
        Port ID: 20500
        Port Symbolic Name: SUN     LCSM100_F       0735
        Node WWN: 200200a0b85a8c82
    Remote Port WWN: 2101001b323a45e5
        Active FC4 Types: SCSI,IP
        SCSI Target: no
        Port ID: 20000
        Port Symbolic Name:
        Node WWN: 2001001b323a45e5
    Remote Port WWN: 10000000c9c07a6c
        Active FC4 Types: SCSI,IP
        SCSI Target: no
        Port ID: 20a00
        Port Symbolic Name:
        Node WWN: 20000000c9c07a6c
Example 3  Display All the Remote Ports Visible Through a Local HBA Port and Their Link Statistics To list all the remote ports visible through a local HBA port and their link statistics, use the fcinfo remote-port -ls -p PWWN command.
# fcinfo remote-port -ls -p 2100000e1ec95100
HBA Port WWN: 2100000e1ec95100
  Count of Remote Port(s): 4
    Remote Port WWN: 10000000c97ecedc
        Active FC4 Types: SCSI,IP
        SCSI Target: no
        Port ID: 150400
        Port Symbolic Name:
        Node WWN: 20000000c97ecedc
        Link Error Statistics:
                Link Failure Count: 0
                Loss of Sync Count: 6
                Loss of Signal Count: 2
                Primitive Seq Protocol Error Count: 0
                Invalid Tx Word Count: 33
                Invalid CRC Count: 0
    Remote Port WWN: 21000024ff41d9a4
        Active FC4 Types: SCSI
        SCSI Target: no
        Port ID: 150200
        Port Symbolic Name: qlc(0,0)
        Node WWN: 20000024ff41d9a4
        Link Error Statistics:
                Link Failure Count: 0
                Loss of Sync Count: 0
                Loss of Signal Count: 0
                Primitive Seq Protocol Error Count: 0
                Invalid Tx Word Count: 4
                Invalid CRC Count: 0
    Remote Port WWN: 201600a0b82a38bc
        Active FC4 Types: SCSI
        SCSI Target: yes
        Port ID: 150700
        Port Symbolic Name: SUN     CSM200_R        0660
        Node WWN: 200600a0b82a38bc
        Link Error Statistics:
                Link Failure Count: 12
                Loss of Sync Count: 1024
                Loss of Signal Count: 20842
                Primitive Seq Protocol Error Count: 0
                Invalid Tx Word Count: 0
                Invalid CRC Count: 0
    Remote Port WWN: 21000024ff51bb4a
        Active FC4 Types: SCSI
        SCSI Target: yes
        Port ID: 150100
        Port Symbolic Name: qlt0,0
        Node WWN: 20000024ff51bb4a
        Link Error Statistics:
                Link Failure Count: 1
                Loss of Sync Count: 0
                Loss of Signal Count: 0
                Primitive Seq Protocol Error Count: 0
                Invalid Tx Word Count: 0
                Invalid CRC Count: 0
        LUN: 0
          Vendor: SUN
          Product: COMSTAR
          OS Device Name: Unknown
Example 4  Display All the Logical Units and Its Information To list all the logical units and its information, use the fcinfo lu -v command.
OS Device Name: /dev/rmt/3n
        HBA Port WWN: 2100000e1ec95101
        Controller: /dev/cfg/c7
                Remote Port WWN: 500104f000ad3d19
                        LUN: 0
                        State: unknown
                        Class:
        Vendor: SUN
        Product: EXAMPLE-TD7
        Device Type: Tape Device
        Unformatted capacity:  0.000 MBytes
OS Device Name: /dev/rmt/5n
        HBA Port WWN: 2100000e1ec95101
        Controller: /dev/cfg/c7
                Remote Port WWN: 500104f000ad3d0e
                        LUN: 0
                        State: unknown
                        Class:
        Vendor: SUN
        Product: EXAMPLE-TD5
        Device Type: Tape Device
        Unformatted capacity:  0.000 MBytes
Example 5  Display All the Logical Units on a Remote Port To list all the logical units on a remote port, use the fcinfo lu -v -P PWWN command.
 
# fcinfo lu -v -P 500104f000ad3d19
OS Device Name: /dev/rmt/0n
        HBA Port WWN: 2100000e1ec95101
        Controller: /dev/cfg/c7
                Remote Port WWN: 500104f000ad3cfe
                        LUN: 0
                        State: unknown
                        Class:
        Vendor: STK.EXAMPLE
        Product: T10000A
        Device Type: Tape Device
        Unformatted capacity:  0.000 MBytes
cfgadm – Dynamically reconfigures storage devices and FC devices. This command is used most frequently to configure storage devices on a SAN. This command also provides configuration administration operations on dynamically reconfigurable hardware resources. For more information, see the cfgadm(1M) man page. The following examples shows the different administration operations that can be performed by using the cfgadm command:
Example 6  Display All the Attachment Points The cfgadm command lists all attachment points except dynamic attachment points.
# cfgadm
Ap_Id                          Type         Receptacle   Occupant     Condition
c1                             scsi-sas     connected    configured   unknown
c2                             scsi-sas     connected    configured   unknown
c3                             scsi-sas     connected    configured   unknown
c4                             scsi-sas     connected    configured   unknown
c5                             scsi-sas     connected    configured   unknown
c6                             fc-fabric    connected    unconfigured unknown
c7                             fc-public    connected    unconfigured unknown
c8                             scsi-sas     connected    configured   unknown
c9                             scsi-sas     connected    configured   unknown
hca:10E00001430070             IB-HCA       connected    configured   ok
ib                             IB-Fabric    connected    configured   ok
usb0/1                         unknown      empty        unconfigured ok
usb0/2                         unknown      empty        unconfigured ok
Example 7  Display the Current Configurable Hardware Information To list the current configurable hardware information, including those represented by dynamic attachment points, use the cfgadm -al command.
# cfgadm -al
Ap_Id                          Type         Receptacle   Occupant     Condition
c1                             scsi-sas     connected    configured   unknown
c1::dsk/c1t0d0                 CD-ROM       connected    configured   unknown
c2                             scsi-sas     connected    configured   unknown
c2::w5000cca0162922a1,0        disk-path    connected    configured   unknown
c3                             scsi-sas     connected    configured   unknown
c3::w5000cca0162b81b5,0        disk-path    connected    configured   unknown
c4                             scsi-sas     connected    configured   unknown
c4::w5000cca0162b899d,0        disk-path    connected    configured   unknown
c5                             scsi-sas     connected    configured   unknown
c5::w5000cca0162a6bcd,0        disk-path    connected    configured   unknown
c6                             fc-fabric    connected    unconfigured unknown
c6::10000000c97ecedc           unknown      connected    unconfigured unknown
c6::201600a0b82a38bc           disk         connected    unconfigured unknown
c6::21000024ff41d9a4           unknown      connected    unconfigured unknown
c6::21000024ff51bb4a           unknown      connected    unconfigured unknown
c7                             fc-public    connected    unconfigured unknown
c7::10000000c97ecedd           unknown      connected    unconfigured unknown
c7::10000000c9c07a6c           unknown      connected    unconfigured unknown
Example 8  Display the Status of the LUN To know the status of the LUN, use the cfgadm -al -o show_SCSI_LUN command. For example:
# cfgadm -al -o show_SCSI_LUN
Ap_Id                          Type         Receptacle   Occupant     Condition
c6                             fc-fabric    connected    configured   unknown
c6::10000000c97ecedc           unknown      connected    configured   unknown
c6::201600a0b82a38bc           disk         connected    unconfigured unknown
c6::21000024ff41d9a4           unknown      connected    unconfigured unknown
c6::21000024ff51bb4a           unknown      connected    unconfigured unknown
c7                             fc-public    connected    unconfigured unknown
c7::10000000c97ecedd           unknown      connected    unconfigured unknown
c7::10000000c9c07a6c           unknown      connected    configured   unknown
c7::10000000c9c07a6d           unknown      connected    unconfigured unknown
c7::202200a0b85a8c82           disk         connected    unconfigured unknown
c7::202300a0b85a8c82           disk         connected    unconfigured unknown
c7::203200a0b85a8c82           disk         connected    unconfigured unknown
c7::203300a0b85a8c82           disk         connected    unconfigured unknown
c7::2100001b321a45e5           unknown      connected    unconfigured unknown
c7::21000024ff2cd75a           unknown      connected    unconfigured unknown
c7::21000024ff2cd75b           unknown      connected    configured   unknown
c7::2101001b323a45e5           unknown      connected    unconfigured unknown