for Windows
Command
wmic bios get serialnumber
What tools can be used to modify the node manager user name and password for a standalone OHS 12c domain?
Note: A standalone domain is a container for system components, such as Oracle HTTP Server. It has a directory structure similar to an Oracle WebLogic Server Domain, but it does not contain an Administration Server or Managed Servers. It can contain one or more instances of system components of the same type, such as Oracle HTTP Server, or a mix of system component types. Reference 1.4.2 Standalone Domain
The steps are as follows:
1. Stop the Oracle HTTP Server component and the Node Manager (NM) :
2. Invoke WLST offline:
3. Read in the domain:
4. Get the security MBean:
5. Change the NM user name:
Need to provide a node manager user
name on this step, this can be an old user name. Otherwise, the NM
password may not modify correctly.
6. Change the NM password then commit the changes. You can give a clear text password such as 'welcome1'.
The encrypted password will be stored in /u01/oracle/config/ohs_domain/nodemanager/nm_password.properties.
Checking timestamps you can see that the following files have been updated:
/u01/oracle/config/ohs_domain/config/config.xml
/u01/oracle/config/ohs_domain/config/nodemanager/nm_password.properties
7. Restart NM:
8. Finally, restart OHS
9. It is possible to prevent the prompt for the NM password on
each OHS startup by storing the password in an encrypted form using a
key store with the command:
10. If the old password was previously stored in a key store before the password was changed, the cached key store files need to be removed before restarting the OHS component:
11. If required, the new password can then be re-stored using the same command:
 To Bottom To Bottom |
Let see how we can grant normal user root access by adding to root group.
# adduser user1
# adduser user2
# groupadd test
These are the groups I have in my Linux box.
# groups
root bin daemon sys adm disk wheel
I am going to add user1 to root group as follows:
# usermod -G root user1
The command given below provides the existing user with the root privilege
# usermod -g 0 -o root_user
I have added a new user, 'user3' to the root group using one single command:
# useradd -m -G root user3
# groups user3
user3 : user3 root
Another option using useradd command
useradd -c “Imitation Root” -d /home/root_user -m -k /etc/skel -s /bin/bash -u 0 -o -g root root_user
Edit /etc/passwd for the particular user. Change the user's UID and GID to '0'. This will give root permissions to user.
root:x:0:0:root:/root:/bin/bash
temproot:x:128:128:temproot
Now, temproot user should have root privilege:
root:x:0:0:root:/root:/bin/bash
temproot:x:0:0:temproot
Note: This is not the recommended method for granting root access
The sudo configuration file is /etc/sudoers and you can edit this file using visudo command: # visudo.
Using visudo protects from conflicts and guarantees that the right syntax is used.
To give full access to specific users
Add the entry given below in the file:
bob, tom ALL=(ALL) ALL
Following this method is not a good idea because this allows both bob and tom to use the su command to grant themselves permanent root privileges. Thereby skipping the command logging features of sudo.
Granting access to specific files to one particular user
This entry allows bob and all the other members of the group operator to gain access to all the program files in the /sbin and /usr/sbin directories, as well as the privilege of running the command /usr/oracle/backup.pl.
bob, %operator ALL= /sbin/, /usr/sbin, /usr/oracle/backup.pl
If you have any questions or thoughts to share on this topic, use the feedback form.
passwd -s |
passwd -s -a |
passwd -s username |
|
Field |
Description |
For Further Information |
|---|---|---|
|
username
|
The user's login name. |
|
|
status
|
The user's password status. PS indicates the account has a password. LK indicates
the password is locked. NP indicates the account has no password. |
See "Locking a Password". |
|
mm/dd/yy
|
The date, based on Greenwich mean time, that the user's password was last changed. |
|
|
min
|
The minimum number of days since the last change that must pass before the password can be changed again. |
See "Setting Minimum Password Life". |
|
max
|
The maximum number of days the password can be used without having to change it. |
See "Setting a Password Age Limit". |
|
warn
|
The number of days' notice that users are given before their passwords have to be changed. |
See "Establishing a Warning Period". |
|
expire
|
A date on which users loose the ability to log in to their accounts. |
See "Password Privilege Expiration". |
|
inactive
|
A limit on the number of days that an account can go without being
logged in to. Once that limit is passed without a log in users can no
longer access their accounts. |
See "Specifying Maximum Number of Inactive Days". |
passwd -s -a -D domainname |
passwd -s -D domainname username
station1% passwd |
passwd username |
passwd -D domainname username |
passwd -l username |
station1% passwd jody |
passwd -f username |
passwd -x 0 username |
passwd -x max username |
station1% passwd -x 45 schweik |
passwd -x max -n min username |
station1% passwd -x 45 -n 7 eponine |
passwd -x max -w warn username |
station1% passwd -x 45 -w 5 nilovna |
passwd -x -1 username |
passwd -x 0 username |
station% passwd -x 0 mendez |
station1% nistbladm -m `shadow=0:0:-1:0:0:0:0' [name=otsu],passwd.org_dir |
nistbladm -m `shadow=n:n:n:n:n:n6:n' [name=login],passwd.org_dir |
station1% nistbladm -m `shadow=n:n:n:n:n:9493:n' [name=pete],passwd.org_dir |
station1% nistbladm -m `shadow=n:n:n:n:n:-1:n' [name=huck],passwd.org_dir |
nistbladm -m `shadow=n:n:n:n:n5:n:n' [name=login],passwd.org_dir |
station1% nistbladm -m `shadow=n:n:n:n:n:7:n:n' [name=sam],passwd.org_dir |
MAXWEEKS= MINWEEKS= PASSLENGTH= |
MAXWEEKS=4 MINWEEKS= PASSLENGTH= |
MAXWEEKS=N |
MINWEEKS=N |
WARNWEEKS=N |
PASSLENGTH=N |
station1# rpc.nispasswdd -a 4 |
station1# rpc.nispasswdd -c 2 |
# logins -x -l username
# logins -x -l jdoe
jdoe       500     staff           10   Jaylee Jaye Doe
/home/jdoe
/bin/bash
PS 010103 10 7 -1
++++++++++++++++++++++++++++
last
OR
last [UserNameHere]
OR
last [option] [UserNameHere]
To display when a user named ‘vivek’ last logged in to the system, type:
$ last vivek
 $ last vivek | less
Sample outputs:

Simply type the last command:
$ last
OR
$ last | less
Sample outputs taken from my RHEL based server:
root     pts/0        10.1.6.120       Mon Jan 27 06:26   still logged in
root     pts/0        10.1.6.120       Mon Jan 27 03:37 - 06:26  (02:48)
root     pts/0        10.1.6.120       Sun Jan 26 02:47 - 09:28  (06:40)
root     pts/4        10.1.6.120       Sat Jan 25 11:02 - 11:02  (00:00)
root     pts/0        10.1.6.120       Sat Jan 25 10:15 - 13:12  (02:56)
root     pts/4        10.1.6.120       Sat Jan 25 06:01 - 06:32  (00:31)
root     pts/0        10.1.6.120       Sat Jan 25 03:08 - 09:04  (05:55)
root     pts/4        10.1.6.120       Sat Jan 25 01:06 - 03:18  (02:11)
root     pts/0        10.1.6.120       Fri Jan 24 23:59 - 02:11  (02:12)
root     pts/0        10.1.6.120       Fri Jan 24 05:30 - 08:39  (03:08)
root     pts/0        10.1.6.120       Thu Jan 23 04:22 - 05:41  (01:19)
....
...
...
root     pts/1        10.1.6.120       Sun Jan  5 11:09 - 14:29  (03:20)
root     pts/0        10.1.6.120       Sun Jan  5 10:05 - 12:19  (02:14)
reboot   system boot  2.6.32-431.3.1.e Sun Jan  5 10:02 - 06:52 (21+20:50)
root     pts/0        10.1.6.120       Sun Jan  5 09:58 - down   (00:00)
root     pts/0        10.1.6.120       Sun Jan  5 03:33 - 05:45  (02:12)
root     pts/1        10.1.6.120       Sat Jan  4 15:06 - 17:28  (02:21)
root     pts/0        10.1.6.120       Sat Jan  4 13:46 - 15:58  (02:11)
root     pts/0        10.1.6.120       Sat Jan  4 05:05 - 07:16  (02:11)
root     pts/1        10.1.6.120       Fri Jan  3 14:29 - 15:44  (01:15)
root     pts/0        10.1.6.120       Fri Jan  3 13:20 - 15:32  (02:11)
root     pts/0        10.1.6.120       Thu Jan  2 05:19 - 05:32  (00:13)
root     pts/0        10.1.6.120       Tue Dec 31 13:57 - 16:06  (02:09)

wtmp begins Tue Dec 31 13:57:23 2013
hostnamectl is most likely the first and last command you need to execute to reveal your RHEL system version:
$ hostnamectl
   Static hostname: localhost.localdomain
Transient hostname: status
         Icon name: computer-vm
           Chassis: vm
        Machine ID: d731df2da5f644b3b4806f9531d02c11
           Boot ID: 384b6cf4bcfc4df9b7b48efcad4b6280
    Virtualization: xen
  Operating System: Red Hat Enterprise Linux Server 7.3 (Maipo)
       CPE OS Name: cpe:/o:redhat:enterprise_linux:7.3:GA:server
            Kernel: Linux 3.10.0-514.el7.x86_64
      Architecture: x86-64
rpm command to query Redhat's release package:
RHEL 7
$ rpm --query redhat-release-server
redhat-release-server-7.3-7.el7.x86_64
RHEL 8
$ rpm --query redhat-release
redhat-release-8.0-0.34.el8.x86_64
$ cat /etc/system-release-cpe
cpe:/o:redhat:enterprise_linux:7.3:ga:server
redhat-lsb package is installed on your system you may also use lsb_release -d command to check Redhat's system version:
$ lsb_release -d
Description: Red Hat Enterprise Linux Server release 7.3 (Maipo)
Alternatively install
redhat-lsb package with:
# yum install redhat-lsb
os-release, redhat-release and system-release:
$ ls /etc/*release
os-release  redhat-release  system-release
Use
cat to check the content of each file to reveal your Redhat OS version. Alternatively, use the below for loop for an instant check:
$ for i in $(ls /etc/*release); do echo ===$i===; cat $i; doneDepending on your RHEL version, the output of the above shell for loop may look different:
===os-release===
NAME="Red Hat Enterprise Linux Server"
VERSION="7.3 (Maipo)"
ID="rhel"
ID_LIKE="fedora"
VERSION_ID="7.3"
PRETTY_NAME="Red Hat Enterprise Linux Server 7.3 (Maipo)"
ANSI_COLOR="0;31"
CPE_NAME="cpe:/o:redhat:enterprise_linux:7.3:GA:server"
HOME_URL="https://www.redhat.com/"
BUG_REPORT_URL="https://bugzilla.redhat.com/"

REDHAT_BUGZILLA_PRODUCT="Red Hat Enterprise Linux 7"
REDHAT_BUGZILLA_PRODUCT_VERSION=7.3
REDHAT_SUPPORT_PRODUCT="Red Hat Enterprise Linux"
REDHAT_SUPPORT_PRODUCT_VERSION="7.3"
===redhat-release===
Red Hat Enterprise Linux Server release 7.3 (Maipo)
===system-release===
Red Hat Enterprise Linux Server release 7.3 (Maipo)
/boot/grub2/grub.cfg and /etc/grub2.cfg. Use grep command to check for menuentry keyword:
# grep -w menuentry /boot/grub2/grub.cfg /etc/grub2.cfgAn another alternative is to check the value of the "GRUB Environment Block":
# grep saved_entry /boot/grub2/grubenv
saved_entry=Red Hat Enterprise Linux Server (3.10.0-514.el7.x86_64) 7.3 (Maipo)
# hostnamectl status
   Static hostname: localhost.localdomain
         Icon name: computer
           Chassis: n/a
        Machine ID: 55cc1c57c7f24ed0b0d352648024cea6
           Boot ID: a12ec8e04e6b4534841d14dc8425e38c
    Virtualization: vmware
  Operating System: CentOS Linux 7 (Core)
       CPE OS Name: cpe:/o:centos:centos:7
            Kernel: Linux 3.10.0-123.el7.x86_64
      Architecture: x86_64
# hostnamectl set-hostname geeklab    ## static
# hostnamectl set-hostname "Geeks LAB"   ## pretty
# hostnamectl
   Static hostname: geekslab
   Pretty hostname: Geeks LAB
         Icon name: computer
           Chassis: n/a
        Machine ID: 55cc1c57c7f24ed0b0d352648024cea6
           Boot ID: a12ec8e04e6b4534841d14dc8425e38c
    Virtualization: vmware
  Operating System: CentOS Linux 7 (Core)
       CPE OS Name: cpe:/o:centos:centos:7
            Kernel: Linux 3.10.0-123.el7.x86_64
      Architecture: x86_64
# nmcli general hostname
localhost.localdomain
# nmcli general hostname geeklab
# service systemd-hostnamed restart
# hostname
geeklab
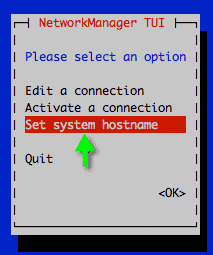
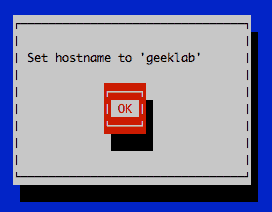
nmtui

# service systemd-hostnamed restart
# hostnamectl
   Static hostname: geeklab
         Icon name: computer
           Chassis: n/a
        Machine ID: 55cc1c57c7f24ed0b0d352648024cea6
           Boot ID: a12ec8e04e6b4534841d14dc8425e38c
    Virtualization: vmware
  Operating System: CentOS Linux 7 (Core)
       CPE OS Name: cpe:/o:centos:centos:7
            Kernel: Linux 3.10.0-123.el7.x86_64
      Architecture: x86_64
# cat /etc/hostname
localhost.localdomain
# echo "geeklab" > /etc/hostname
# cat /etc/hostname
geeklab
# shutdown -r now
# hostname
geeklab
=======================================================
This document describes how to edit hostname in Oracle Linux 7.
Note: manually append "HOSTNAME=xxxxx" into file /etc/sysconfig/network and restart system will not work on Oracle Linux 7.
Solution
To edit hostname in Oracle Linux 7, use either of following methods:
1. use hostname control utility: hostnamectl
2. use NetworkManager command line tool: nmcli
3. edit /etc/hostname file directly (a reboot afterwards is required)
1. Use hostnamectl which is a command-line client to systemd-hostnamed service
Get current hostname status:[root@localhost ~]# hostnamectl status
Static hostname: localhost.localdomain
Icon name: computer
Chassis: n/a
Machine ID: ed264df49f3f42b7b64ca75f763ad117
Boot ID: 3ec1705218b9499b9619e1bdca7be737
Virtualization: oracle
Operating System: Oracle Linux Server 7.1
CPE OS Name: cpe:/o:oracle:linux:7:1
Kernel: Linux 3.8.13-55.1.6.el7uek.x86_64
Architecture: x86_64
Set hostname:[root@localhost ~]# hostnamectl set-hostname oraclelinux.oracle.com
[root@localhost ~]#
Re-login terminal session:[root@oraclelinux ~]# hostnamectl status
Static hostname: oraclelinux.oracle.com
Icon name: computer
Chassis: n/a
Machine ID: ed264df49f3f42b7b64ca75f763ad117
Boot ID: 3ec1705218b9499b9619e1bdca7be737
Virtualization: oracle
Operating System: Oracle Linux Server 7.1
CPE OS Name: cpe:/o:oracle:linux:7:1
Kernel: Linux 3.8.13-55.1.6.el7uek.x86_64
Architecture: x86_642. nmcli
Check current hostname:[root@localhost ~]# nmcli general hostname
localhost.localdomain
Modify hostname and restart ystemd-hostnamed service:[root@localhost ~]# nmcli general hostname oraclelinux.oracle.com
[root@localhost ~]# systemctl restart systemd-hostnamed
Re-login terminal session:[root@oraclelinux ~]# hostname
oraclelinux.oracle.com
3. Edit /etc/hostname
View current content:[root@localhost ~]# cat /etc/hostname
localhost.localdomain
Replace file content with new hostname:[root@localhost ~]# echo "oraclelinux.oracle.com" > /etc/hostname
[root@localhost ~]# cat /etc/hostname
oraclelinux.oracle.com
Restart system and verify:[root@oraclelinux ~]# hostname
oraclelinux.oracle.com