multipath -ll
274 la
275 ls
276 pwd
277 fdisk /dev/mapper/mpathe
278 ls -al
279 partprobe
280 ls -al
281 pwd
282 pvs
283 pvcreate /dev/mapper/mpathe1
284 pvs
285 vgcreate -s 16M u01 /dev/mapper/mpathe1
286 pvs
287 vgdisplay
288 lvcreate --name u01 --size 499.98G u01
289 lvs
290 xfs_mkfile /dev/mapper/u01-u01
291 mkdir -p /u01
292 mount /dev/mapper/u01-u01 /u01
293 xfs_mkfile --help
294 mkfs.xfs /dev/mapper/u01-u01
295 mount /dev/mapper/u01-u01 /u01
296 df -kh
297 vs
298 pvs
299 vgs
300 df -kh
++++++++++++++++++++++++++
Create and Extend XFS filesystem based on LVM
Step:1 Create a partition using fdisk
In the below example i have created 10GB partition on /dev/sdb and set “8e” as toggle id.Create and Extend XFS filesystem based on LVM
Step:1 Create a partition using fdisk
In the below example i have created 10GB partition on /dev/sdb and set “8e” as toggle id.
Step:2 Create LVM components : pvcreate, vgcreate and lvcreate.
[root@linuxtechi ~]# pvcreate /dev/sdb1
 Physical volume "/dev/sdb1" successfully created
[root@linuxtechi ~]#

[root@linuxtechi ~]# vgcreate vg_xfs /dev/sdb1
 Volume group "vg_xfs" successfully created
[root@linuxtechi ~]#

[root@linuxtechi ~]# lvcreate -L +6G -n xfs_db vg_xfs
 Logical volume "xfs_db" created
[root@linuxtechi ~]#
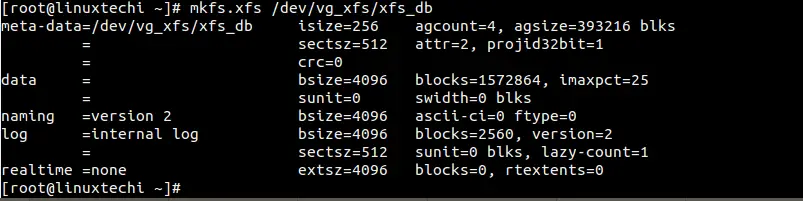
Step:3 Create XFS file system on lvm parition “/dev/vg_xfs/xfs_db”
[root@linuxtechi ~]# mkfs.xfs /dev/vg_xfs/xfs_db
Step:4 Mount the xfs file system
Create a directory named as xfs_test under /root and mount it using mount command.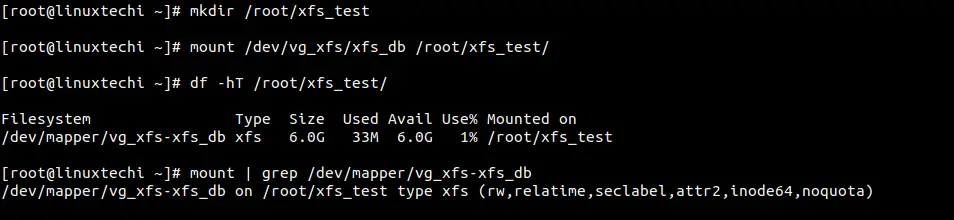
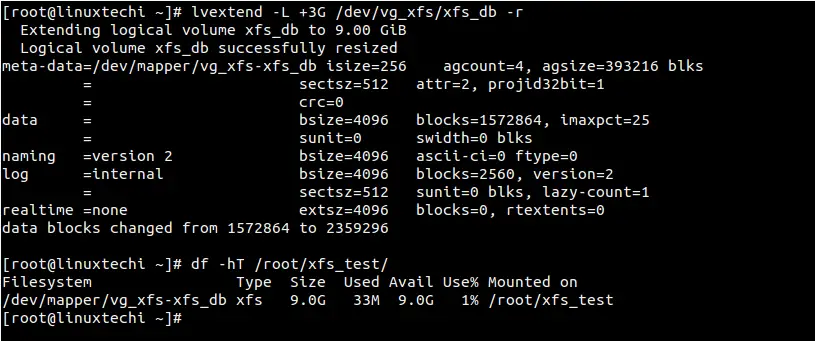
Step:5 Extend the size of xfs file system
Check the whether free space is available in Volume group (vg_xfs) or not using below command :[root@linuxtechi ~]# vgs vg_xfs VG #PV #LV #SN Attr VSize VFree vg_xfs 1 1 0 wz--n- 10.00g 4.00g [root@linuxtechi ~]#
[root@linuxtechi ~]# lvextend -L +3G /dev/vg_xfs/xfs_db -r
Note : If xfs is not based on LVM , the use the xfs_growsfs command as shown below :
[root@linuxtechi ~]# xfs_growfs <Mount_Point> -D <Size>
Step:2 Create LVM components : pvcreate, vgcreate and lvcreate.
[root@linuxtechi ~]# pvcreate /dev/sdb1
 Physical volume "/dev/sdb1" successfully created
[root@linuxtechi ~]#

[root@linuxtechi ~]# vgcreate vg_xfs /dev/sdb1
 Volume group "vg_xfs" successfully created
[root@linuxtechi ~]#

[root@linuxtechi ~]# lvcreate -L +6G -n xfs_db vg_xfs
 Logical volume "xfs_db" created
[root@linuxtechi ~]#
Step:3 Create XFS file system on lvm parition “/dev/vg_xfs/xfs_db”
[root@linuxtechi ~]# mkfs.xfs /dev/vg_xfs/xfs_db
Step:4 Mount the xfs file system
Create a directory named as xfs_test under /root and mount it using mount command.
Step:5 Extend the size of xfs file system
Check the whether free space is available in Volume group (vg_xfs) or not using below command :[root@linuxtechi ~]# vgs vg_xfs VG #PV #LV #SN Attr VSize VFree vg_xfs 1 1 0 wz--n- 10.00g 4.00g [root@linuxtechi ~]#
[root@linuxtechi ~]# lvextend -L +3G /dev/vg_xfs/xfs_db -r
Note : If xfs is not based on LVM , the use the xfs_growsfs command as shown below :
[root@linuxtechi ~]# xfs_growfs <Mount_Point> -D <Size>
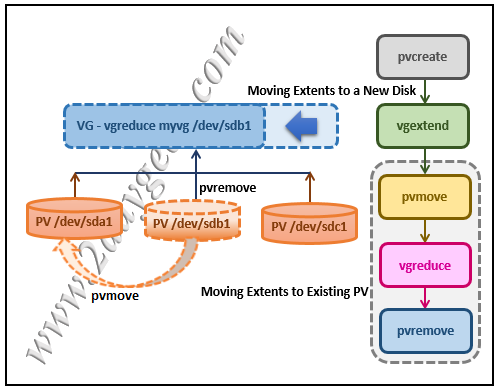
1) Moving Extents to Existing Physical Volumes
Use the pvs command to check if the desired physical volume (we plan to remove the “/dev/sdb1” disk in LVM) is used or not.
# pvs -o+pv_used

PV VG Fmt Attr PSize PFree Used
/dev/sda1 myvg lvm2 a- 75.00G 14.00G 61.00G
/dev/sdb1 myvg lvm2 a- 50.00G 45.00G 5.00G
/dev/sdc1 myvg lvm2 a- 17.15G 12.15G 5.00G
If this is used, check to see if there are enough free extents on the other physics volumes in the volume group.
If so, you can run the pvmove command on the device you want to remove. Extents will be distributed to other devices.
# pvmove /dev/sdb1

/dev/sdb1: Moved: 2.0%
…
/dev/sdb1: Moved: 79.2%
…
/dev/sdb1: Moved: 100.0%
When the pvmove command is complete. Re-use the pvs command to check whether the physics volume is free or not.
# pvs -o+pv_used

PV VG Fmt Attr PSize PFree Used
/dev/sda1 myvg lvm2 a- 75.00G 9.00G 66.00G
/dev/sdb1 myvg lvm2 a- 50.00G 50.00G 0
/dev/sdc1 myvg lvm2 a- 17.15G 12.15G 5.00G
If it’s free, use the vgreduce command to remove the physical volume /dev/sdb1 from the volume group.
# vgreduce myvg /dev/sdb1
Removed "/dev/sdb1" from volume group "myvg"
Finally, run the pvremove command to remove the disk from the LVM configuration. Now, the disk is completely removed from the LVM and can be used for other purposes.
# pvremove /dev/sdb1
Labels on physical volume "/dev/sdb1" successfully wiped.
2) Moving Extents to a New Disk
If you don’t have enough free extents on the other physics volumes in the volume group. Add new physical volume using the steps below.
Request new LUNs from the storage team. Once this is allocated, run the following commands to discover newly added LUNs or disks in Linux.
# ls /sys/class/scsi_host
host0
# echo "- - -" > /sys/class/scsi_host/host0/scan
# fdisk -l
Once the disk is detected in the OS, use the pvcreate command to create the physical volume.
# pvcreate /dev/sdd1
Physical volume "/dev/sdd1" successfully created
Use the following command to add new physical volume /dev/sdd1 to the existing volume group vg01.
# vgextend vg01 /dev/sdd1
Volume group "vg01" successfully extended
Now, use the pvs command to see the new disk “/dev/sdd1” that you have added.
# pvs -o+pv_used

PV VG Fmt Attr PSize PFree Used
/dev/sda1 myvg lvm2 a- 75.00G 14.00G 61.00G
/dev/sdb1 myvg lvm2 a- 50.00G 0 50.00G
/dev/sdc1 myvg lvm2 a- 17.15G 12.15G 5.00G
/dev/sdd1 myvg lvm2 a- 60.00G 60.00G 0
Use the pvmove command to move the data from /dev/sdb1 to /dev/sdd1.
# pvmove /dev/sdb1 /dev/sdd1

/dev/sdb1: Moved: 10.0%
…
/dev/sdb1: Moved: 79.7%
…
/dev/sdb1: Moved: 100.0%
After the data is moved to the new disk. Re-use the pvs command to check whether the physics volume is free.
# pvs -o+pv_used

PV VG Fmt Attr PSize PFree Used
/dev/sda1 myvg lvm2 a- 75.00G 14.00G 61.00G
/dev/sdb1 myvg lvm2 a- 50.00G 50.00G 0
/dev/sdc1 myvg lvm2 a- 17.15G 12.15G 5.00G
/dev/sdd1 myvg lvm2 a- 60.00G 10.00G 50.00G
If it’s free, use the vgreduce command to remove the physical volume /dev/sdb1 from the volume group.
# vgreduce myvg /dev/sdb1
Removed "/dev/sdb1" from volume group "myvg"
Finally, run the pvremove command to remove the disk from the LVM configuration. Now, the disk is completely removed from the LVM and can be used for other purposes.
# pvremove /dev/sdb1
Labels on physical volume "/dev/sdb1" successfully wiped.
Moving Extents to Existing Physical Volumes
myvg.
pvs -o+pv_used
PV VG Fmt Attr PSize PFree Used /dev/sda1 myvg lvm2 a- 17.15G 12.15G 5.00G
/dev/sdb1 myvg lvm2 a- 17.15G 12.15G 5.00G /dev/sdc1 myvg lvm2 a- 17.15G 12.15G
5.00G /dev/sdd1 myvg lvm2 a- 17.15G 2.15G 15.00G
/dev/sdb1 so that it can be removed from the
volume group.
-
If there are enough free extents on the other physical volumes in the volume group, you can execute the
pvmovecommand on the device you want to remove with no other options and the extents will be distributed to the other devices.#
pvmove /dev/sdb1/dev/sdb1: Moved: 2.0% ... /dev/sdb1: Moved: 79.2% ... /dev/sdb1: Moved: 100.0%After thepvmovecommand has finished executing, the distribution of extents is as follows:#
pvs -o+pv_usedPV VG Fmt Attr PSize PFree Used /dev/sda1 myvg lvm2 a- 17.15G 7.15G 10.00G /dev/sdb1 myvg lvm2 a- 17.15G 17.15G 0 /dev/sdc1 myvg lvm2 a- 17.15G 12.15G 5.00G /dev/sdd1 myvg lvm2 a- 17.15G 2.15G 15.00G -
Use the
vgreducecommand to remove the physical volume/dev/sdb1from the volume group.#
vgreduce myvg /dev/sdb1Removed "/dev/sdb1" from volume group "myvg" # pvs PV VG Fmt Attr PSize PFree /dev/sda1 myvg lvm2 a- 17.15G 7.15G /dev/sdb1 lvm2 -- 17.15G 17.15G /dev/sdc1 myvg lvm2 a- 17.15G 12.15G /dev/sdd1 myvg lvm2 a- 17.15G 2.15G
5.4.2. Moving Extents to a New Disk
myvg as follows:
# pvs -o+pv_used
  PV         VG   Fmt  Attr PSize  PFree  Used
  /dev/sda1  myvg lvm2 a-   17.15G  7.15G 10.00G
  /dev/sdb1  myvg lvm2 a-   17.15G 15.15G  2.00G
  /dev/sdc1  myvg lvm2 a-   17.15G 15.15G  2.00G
/dev/sdb1 to a new device,
/dev/sdd1.
-
Create a new physical volume from
/dev/sdd1.#
pvcreate /dev/sdd1Physical volume "/dev/sdd1" successfully created -
Add the new physical volume
/dev/sdd1to the existing volume groupmyvg.#
vgextend myvg /dev/sdd1Volume group "myvg" successfully extended #pvs -o+pv_usedPV VG Fmt Attr PSize PFree Used /dev/sda1 myvg lvm2 a- 17.15G 7.15G 10.00G /dev/sdb1 myvg lvm2 a- 17.15G 15.15G 2.00G /dev/sdc1 myvg lvm2 a- 17.15G 15.15G 2.00G /dev/sdd1 myvg lvm2 a- 17.15G 17.15G 0 -
Use the
pvmovecommand to move the data from/dev/sdb1to/dev/sdd1.#
pvmove /dev/sdb1 /dev/sdd1/dev/sdb1: Moved: 10.0% ... /dev/sdb1: Moved: 79.7% ... /dev/sdb1: Moved: 100.0% #pvs -o+pv_usedPV VG Fmt Attr PSize PFree Used /dev/sda1 myvg lvm2 a- 17.15G 7.15G 10.00G /dev/sdb1 myvg lvm2 a- 17.15G 17.15G 0 /dev/sdc1 myvg lvm2 a- 17.15G 15.15G 2.00G /dev/sdd1 myvg lvm2 a- 17.15G 15.15G 2.00G -
After you have moved the data off
/dev/sdb1, you can remove it from the volume group.#
vgreduce myvg /dev/sdb1Removed "/dev/sdb1" from volume group "myvg"This article will serve solution for below questions :
- How to safely remove the disk from LVM
- How to remove the disk from VG online
- How to copy data from one disk to other at the physical level
- How to replace a faulty disk in LVM online
- How to move physical extents from one disk to another
- How to free up disk from VG to shrink VG size
- How to safely reduce VG
We have
volume group
named vg01 which has 20M
logical volume
created in it and mounted it on /mydata mount point. Check
lsblk output below –
root@kerneltalks # lsblk
NAME
                      MAJ:MIN RM SIZE RO TYPE MOUNTPOINT
xvda
                      202:0    0  10G  0 disk
├─xvda1
                      202:1    0   1M  0
                      part
└─xvda2
                      202:2    0  10G  0 part /
xvdf
                      202:80   0   1G  0 disk
└─vg01-lvol1 253:0    0  20M  0
                      lvm
/mydata
|
Now, attach new disk of the same or bigger size of the disk
/dev/xvdf. Identify the new disk on the system by using
lsblk command again and comparing the output to the previous
one.
root@kerneltalks # lsblk
NAME
                      MAJ:MIN RM SIZE RO TYPE MOUNTPOINT
xvda
                      202:0    0  10G  0 disk
├─xvda1
                      202:1    0   1M  0
                      part
└─xvda2
                      202:2    0  10G  0 part /
xvdf
                      202:80   0   1G  0 disk
└─vg01-lvol1 253:0    0  20M  0
                      lvm
/mydata
xvdg
                      202:96   0   1G  0 disk
|
You can see the new disk has been identified as /dev/xvdg.
Now, we will add this disk to current VG vg01. This can be
done using
vgextend command. Obviously, before using it in LVM you need to run
pvcreate
on it.
root@kerneltalks # pvcreate /dev/xvdg
Physical volume "/dev/xvdg"
successfully created.
root@kerneltalks # vgextend vg01 /dev/xvdg
Volume group "vg01"
successfully extended
|
Now we have disk to be removed /dev/xvdf and new disk to be
added /dev/xvdg in the same volume group
vg01. You can verify it using
pvs command
root@kerneltalks # pvs
PV
                      VG   Fmt  Attr PSize
                      PFree
/dev/xvdf
vg01 lvm2 a-- 1020.00m 1000.00m
/dev/xvdg
vg01 lvm2 a-- 1020.00m 1020.00m
|
Observe the above output. Since we created a 20M mount point from disk
/dev/xvdf it has 20M less free size. The new disk
/dev/xvdg is completely free.
Now, we need to move physical extents from disk xvdf to
xvdg.
pvmove
is the command used to achieve this. You just need to supply a disk name
from where you need to move out PE. Command will move PE out of that disk
and write them to all available disks in the same volume group. In our
case, only one other disk is available to move PE.
root@kerneltalks # pvmove /dev/xvdf
/dev/xvdf: Moved: 0.00%
/dev/xvdf: Moved: 100.00%
|
Move progress is shown periodically. If due to any reason operation interrupted in between then moved PE will remain at destination disks and un-moved PEs will remain on the source disk. The operation can be resumed by issuing the same command again. It will then move the remaining PE out of the source disk.
You can even run it in background with nohup.
root@kerneltalks # pvmove /dev/xvdf 2>error.log >normal.log
&
[1] 1639
|
In the above command, it will run pvmove in the background.
It will redirect normal console outputs in normal.log file
under the current working directory whereas errors will be redirected and
saved in error.log file in the current working directory.
Now if you check pvs output again, you will find all
space on disk xvdf is free which means its not been used to
store any data in that VG. This ensures you can remove the disk without
any issues.
root@kerneltalks # pvs
PV
                      VG   Fmt  Attr PSize
                      PFree
/dev/xvdf
vg01 lvm2 a-- 1020.00m 1020.00m
/dev/xvdg
vg01 lvm2 a-- 1020.00m 1000.00m
|
Before removing/detaching disk from the server, you need to remove it from LVM. You can do this by reducing VG and opting for that disk out.
root@kerneltalks # vgreduce vg01 /dev/xvdf
Removed "/dev/xvdf"
from volume group "vg01"
|
Now disk xvdf can be removed/detached from server safely.
Few useful switches of pvmove :
Verbose mode prints more detailed information on the operation. It can be
invoked by using -v switch.
root@kerneltalks # pvmove -v /dev/xvdf
Cluster mirror log daemon is not running.
Wiping internal VG cache
Wiping cache of LVM-capable devices
Archiving volume group "vg01"
metadata (seqno 17).
Creating logical volume pvmove0
activation/volume_list
configuration setting not defined: Checking only host
                      tags
for
vg01/lvol1.
Moving 5 extents of logical volume vg01/lvol1.
activation/volume_list
configuration setting not defined: Checking only host
                      tags
for
vg01/lvol1.
Creating vg01-pvmove0
Loading table for
vg01-pvmove0 (253:1).
Loading table for
vg01-lvol1 (253:0).
Suspending vg01-lvol1 (253:0) with device flush
Resuming vg01-pvmove0 (253:1).
Resuming vg01-lvol1 (253:0).
Creating volume group backup "/etc/lvm/backup/vg01"
(seqno 18).
activation/volume_list
configuration setting not defined: Checking only host
                      tags
for
vg01/pvmove0.
Checking progress before waiting every 15 seconds.
/dev/xvdf: Moved: 0.00%
/dev/xvdf: Moved: 100.00%
Polling finished successfully.
|
The interval at which command updates the progress can be changed.
-i switch followed by a number of seconds can be used to get
updates from command on user-defined intervals on progress.
root@kerneltalks # pvmove -i 1 /dev/xvdf
|
In this example, we will be deleting “testlv” from the volume group “datavg”. The LV is mounted on the mount point /data01.
# df -hP | grep -i data01
/dev/mapper/datavg-testlv  976M  2.6M  907M   1% /data01
# lvs
  LV     VG     Attr       LSize  Pool Origin Data%  Meta%  Move Log Cpy%Sync Convert
  root   centos -wi-ao---- 17.47g
  swap   centos -wi-ao----  2.00g
  testlv datavg -wi-ao----  1.00g
# 1 root@arch-bill /home/bill # gdisk /dev/sdb                                                                                                                                                                                              :(
GPT fdisk (gdisk) version 0.8.10

Partition table scan:
  MBR: protective
  BSD: not present
  APM: not present
  GPT: present

Found valid GPT with protective MBR; using GPT.

Command (? for help): t
Partition number (1-6): 2
Current type is 'Microsoft basic data'
Hex code or GUID (L to show codes, Enter = 8300):
Changed type of partition to 'Linux filesystem'

Command (? for help): t
Partition number (1-6): 3
Current type is 'Microsoft basic data'
Hex code or GUID (L to show codes, Enter = 8300):
Changed type of partition to 'Linux filesystem'

Command (? for help): t
Partition number (1-6): 4
Current type is 'Microsoft basic data'
Hex code or GUID (L to show codes, Enter = 8300):
Changed type of partition to 'Linux filesystem'

Command (? for help): t
Partition number (1-6): 6
Current type is 'Microsoft basic data'
Hex code or GUID (L to show codes, Enter = 8300):
Changed type of partition to 'Linux filesystem'

Command (? for help): p
Disk /dev/sdb: 3907029168 sectors, 1.8 TiB
Logical sector size: 512 bytes
Disk identifier (GUID): 0645408C-0374-4357-8663-D2A3512E07BD
Partition table holds up to 128 entries
First usable sector is 34, last usable sector is 3907029134
Partitions will be aligned on 2048-sector boundaries
Total free space is 4204653 sectors (2.0 GiB)

Number  Start (sector)    End (sector)  Size       Code  Name
   1            2048            6143   2.0 MiB     EF02
   2            8192         8396799   4.0 GiB     8300
   3         8398848        41953279   16.0 GiB    8300
   4        41955328       167786495   60.0 GiB    8300
   6       167788544      3902834687   1.7 TiB     8300

Command (? for help): w

Final checks complete. About to write GPT data. THIS WILL OVERWRITE EXISTING
PARTITIONS!!

Do you want to proceed? (Y/N): Y
OK; writing new GUID partition table (GPT) to /dev/sdb.
The operation has completed successfully.
1 root@arch-bill /home/bill # fdisk -l                                                                                                                                                                                                    :(

Disk /dev/sdb: 1.8 TiB, 2000398934016 bytes, 3907029168 sectors
Units: sectors of 1 * 512 = 512 bytes
Sector size (logical/physical): 512 bytes / 4096 bytes
I/O size (minimum/optimal): 4096 bytes / 4096 bytes
Disklabel type: gpt
Disk identifier: 0645408C-0374-4357-8663-D2A3512E07BD

Device           Start          End   Size Type
/dev/sdb1         2048         6143     2M BIOS boot partition
/dev/sdb2         8192      8396799     4G Linux filesystem
/dev/sdb3      8398848     41953279    16G Linux filesystem
/dev/sdb4     41955328    167786495    60G Linux filesystem
/dev/sdb6    167788544   3902834687   1.8T Linux filesystem


Disk /dev/sdc: 298.1 GiB, 320072933376 bytes, 625142448 sectors
Units: sectors of 1 * 512 = 512 bytes
Sector size (logical/physical): 512 bytes / 512 bytes
I/O size (minimum/optimal): 512 bytes / 512 bytes
Disklabel type: gpt
Disk identifier: 5607E1F7-1A96-4EF5-A353-29BE91873431

Device           Start          End   Size Type
/dev/sdc1         2048      6293503     3G Linux swap
/dev/sdc2      6295552    618600447   292G Microsoft basic data


Disk /dev/sda: 931.5 GiB, 1000204886016 bytes, 1953525168 sectors
Units: sectors of 1 * 512 = 512 bytes
Sector size (logical/physical): 512 bytes / 4096 bytes
I/O size (minimum/optimal): 4096 bytes / 4096 bytes
Disklabel type: gpt
Disk identifier: C3E095E9-90D9-4BFA-A97F-5D74E64FC4A4

Device           Start          End   Size Type
/dev/sda1         8192     32776191  15.6G Microsoft basic data
/dev/sda2     32778240   1953509375 915.9G Microsoft basic data
/dev/sda3         2048         6143     2M BIOS boot partition

root@arch-bill /home/bill #
1. Delete the entry of the mount point from the /etc/fstab :
# cat /etc/fstab
...
/dev/mapper/datavg-testlv            /data01              ext4    defaults        0 0
...
2. Unmount the mount point :
# umount /data01
3. Disable lvm :
# lvchange -an /dev/datavg/testlv
4. Delete lvm volume :
# lvremove /dev/datavg/testlv
5. Disable volume group :
# vgchange -an datavg
6. Delete volume group :
# vgremove datavg
7. Delete physical Volumes being used for the volume group “datavg” :
# pvremove /dev/sdb /dev/sdc
Process summary
The process is straightforward. Attach the new storage to the system. Next, create a new Physical Volume (PV) from that storage. Add the PV to the Volume Group (VG) and then extend the Logical Volume (LV).
Look at the picture below. The red line mark shows the original size of the root mount point. The xvdc disk is the new disk attached to it. Extend the root partition to make it 60G in size.

[ Want to test your sysadmin skills? Take a skills assessment today. ]
Create a Physical Volume

[root@redhat-sysadmin ~]# pvcreate /dev/xvdc
  Physical volume "/dev/xvdc" successfully created.
When you attach the new storage /dev/xvdc, you need to use the pvcreate command in order for the disk to be initialized and be seen by the Logical Volume Manager (LVM).
[ You might also like: Creating and managing partitions in Linux with parted ]
Identify the Volume Group
Next, you need to identify the Volume Group (VG) to which you are extending the new disk with the vgs command. Mine is called centos, and that's the only VG available currently on my LVM.

Extend the Volume Group
The vgextend command allows you to add one or more initialized Physical Volumes to an existing VG to extend its size.
As you can see, you want to extend the centos Volume Group.

After extending it, type the vgs or vgdisplay commands for a more detailed overview of the VG.
The vgs command shows only the VG in with a few lines.

The vgdisplay shows all the VGs in the LVM and displays the complete information about them.

As you can see from the image above, marked with red, you have 10GB free. You can decide to extend all or some amount of storage size to it.
Identify the Logical Volume
The lvs or lvdisplay command shows the Logical Volume associated with a Volume Group. Use the lvs command, and the Logical Volume you're trying to extend is the root, which belongs to the centos VG. As you can see above, you've already extended the VG. Next, extend the Logical Volume.

Extend the Logical Volume
Extend the LV with the lvextend command. The lvextend command allows you to extend the size of the Logical Volume from the Volume Group.

[root@redhat-sysadmin ~]# lvextend -l +100%FREE /dev/centos/root.Extend the filesystem
You need to confirm the filesystem type you're using, Red Hat uses the XFS filesystem, but you can check the filesystem with lsblk -f or df -Th.
Resize the filesystem on the Logical Volume after it has been extended to show the changes. Resize the XFS filesystem by using the xfs_growfs command.

Finally, verify the size of your extended partition.

[ Free online course: Red Hat Enterprise Linux technical overview. ]